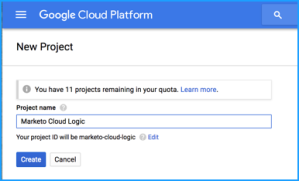
This article proposes a solution to extend Marketo with some business logic capabilities with Google Cloud Platform (GCP), based on the following simple example:
3 custom fields on the Marketo Lead record:
OnLinePreference: an incremental score that indicates a prospect/customer appetence for online communications.
OfflinePreference: an incremental score that indicates a prospect/customer appetence for offline communications.
Preference: a field computed by GCP that displays “offline’ if the offline score is higher than the online one, and “online” the other way around
This technology opens the way for more advanced business logic and eventually for calling out external web services, transforming and consolidating the results in Marketo.
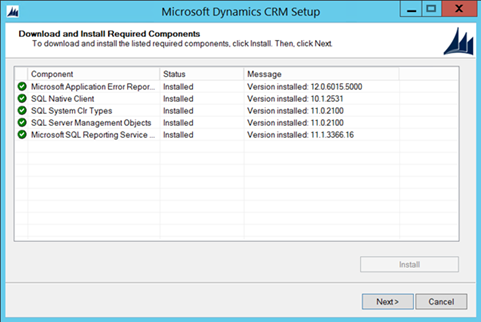
About Google Cloud Platform and Functions
Google Cloud Platform (GCP) is a suite of cloud computing services that runs on the same infrastructure that Google uses internally for its end-user products, such as Google Search and YouTube. Alongside a set of management tools, it provides a series of modular cloud services including computing, data storage, data analytics, machine learning, big data and much more.
We could have used many different GCP services for our need, such as Compute Engine, App Engine or Kubernetes Engine, but we opted for the Cloud Functions (still in Beta) for the following main advantages:
Serverless cloud computing where logic can be spun up on-demand in response to events such as HTTP calls.
Relieves most of the pain caused by server maintenance and deployments.
Cost effective, as you pay GCP only for each function call and not for keeping a server up and running.
Simple and fast to implement as you focus only on your application logic.
Automatic scaling, ready for very high workloads.
Please check GCP web site for more information about this technology and its pricing. Typically, this tutorial should not induce any important cost and will fit perfectly within the free credit of a GCP trial.
Preparation of your Google Cloud environment
You need a Google Cloud account. You can try GCP for free with a credit that is more than enough to run this tutorial, just click “Try it free” button on the GCP web site.
Follow all the steps from the section ‘Before you begin’ in the HTTP Tutorial from Google:
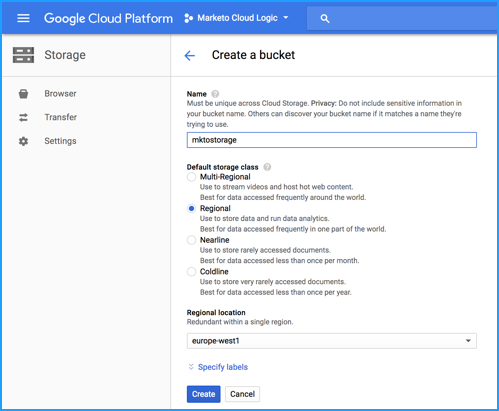
Create a Cloud Storage bucket to stage your Cloud Functions files. You can do it with the command line:
gsutil mb gs://[YOUR_STAGING_BUCKET_NAME]
or from the Google Cloud web interface, by selecting your project and clicking the Storage menu:
Give your Storage bucket a unique name
Select the default storage class
Select the best suited regional location
Create a directory on your local system for the application code.
Create an ‘index.js’ file in this directory with the following JavaScript code: the code is really simple to understand. It parses the two input parameters from the HTTP request body in JSON, does the processing and encodes in JSON the HTTP response.
/**
 * HTTP scoreCompare Cloud Function.
 *
 * @param {Object} req Cloud Function request context.
 * @param {Object} res Cloud Function response context.
 */
exports.scoreCompare = function scoreCompare (req, res) {
 var onlineScore=parseInt(req.body.onlineScore);
 var offlineScore=parseInt(req.body.offlineScore);
 console.log('/scoreCompare: got values onlineScore =' + onlineScore + ', offlineScore =' + offlineScore);
 var result;
 if (onlineScore>offlineScore) {result = 'online';} else {result = 'offline';}
 console.log('/scoreCompare: and result is ' + result);
 res.status(200).json({output: result}).end();
};
Deploy the function scoreCompare with an HTTP trigger. Run the following command from your directory:
Body: {“onlineScore”:110, “offlineScore”:200}Output should give: {“output”: “offline”}.
Call the Cloud Function from a Marketo’s Webhook
The three following custom fields must be created on the Lead record in Marketo:
OnlinePreference: Integer
OfflinePreference: Integer
Preference: String
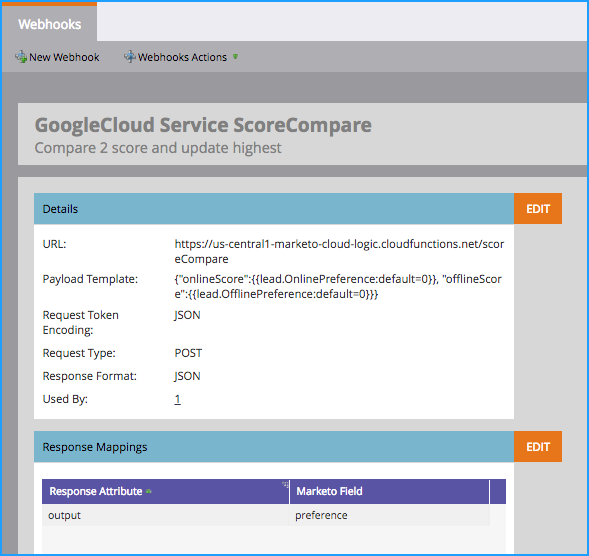
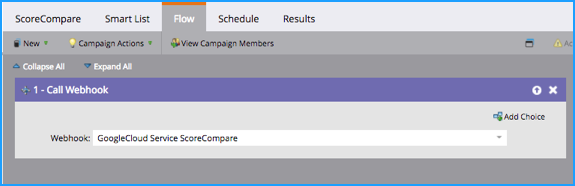
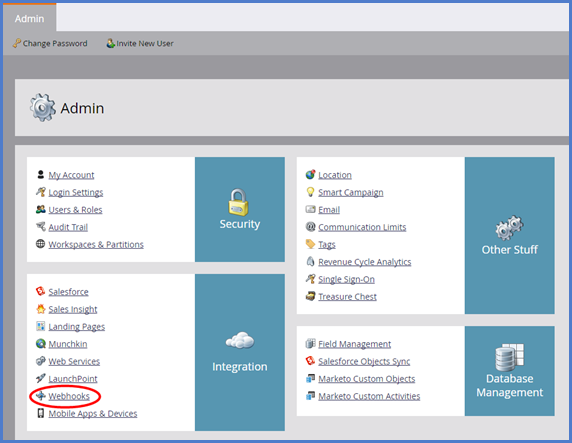
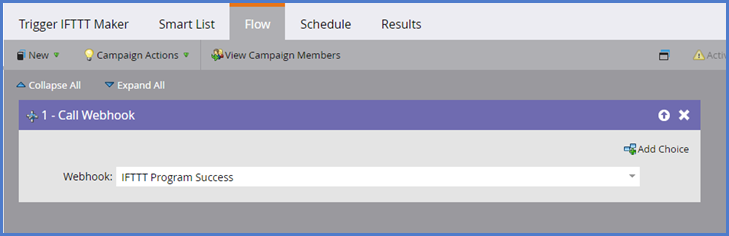
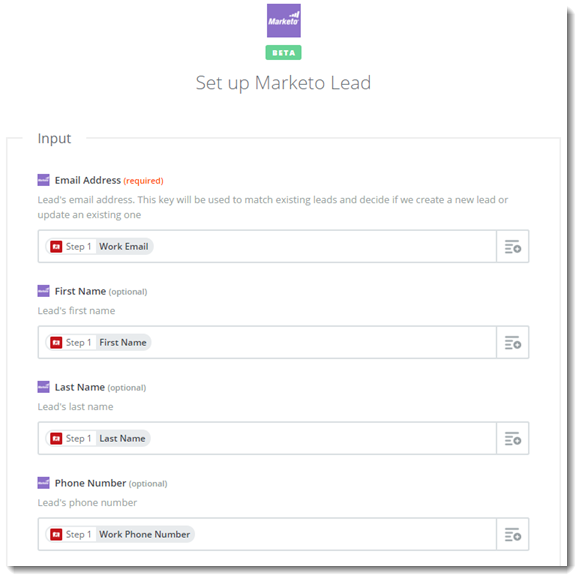
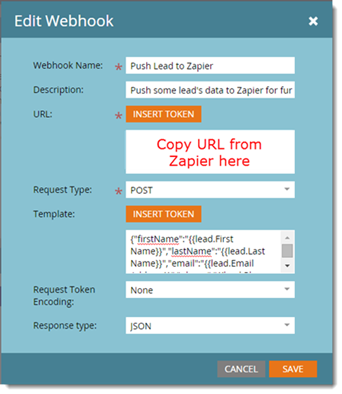
Create the following webhook from the Marketo admin interface by using your ‘scoreCompare’ cloud function URL and the custom field’s tokens:
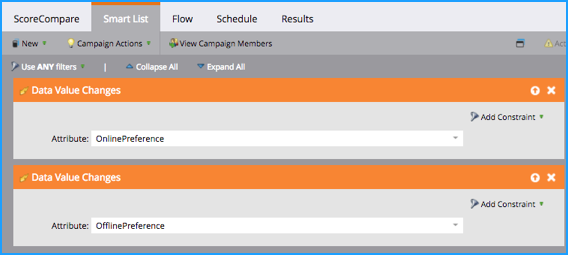
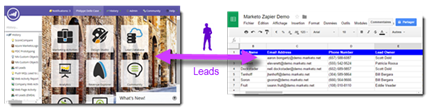
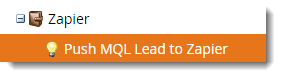
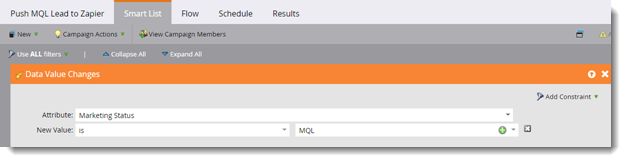
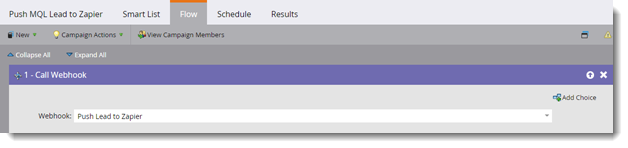
Test the webhook with a Marketo triggered smart campaign. A smart list and flow are showed here after, as an example:
Marketo webhooks can only be invoked from triggered smart campaigns, not batch smart campaigns.
If you do not use your cloud function, delete it or delete the whole project, in order to avoid incurring charges to your Google Cloud Platform account.
Conclusion
We hope this tutorial was worth your time and that it will make you think about more advanced scenarios involving complex processing and 3rd party services.
A good example would be to leverage Google Cloud AI, the machine learning services from Google. You could, for example, parse some free text from a Marketo form and ask Google Natural Language API to reveal the structure and meaning of the text and then save back this analysis in Marketo; just opening the floodgates for ideas.
The Internet of Things (IoT) is the inter-networking of connected devices, appliances, wearables, vehicles, etc. with embedded electronics, software, sensors, and network connectivity that enable these objects to collect and exchange data with cloud information systems. These technologies are growing and trending so fast that they will impact how we live, how we work and how we do business in no time.
Marketo the leading Marketing Engagement Platform is ready for the IoT with its capabilities to scale and interact with any form of communication channel. Marketo can track already over 70 types of activities related to emails, web, mobile, CRM, etc … and it supports also custom activities that can be fed by any 3rd party system. Marketo custom objects make possible to track all kinds of 3rd party metrics related to your business, and allows marketers to leverage those metrics right from Marketo smart campaign filters and triggers.
Implementing IoT for consumers would require a centralized server to interact with consumer devices and this server would exchange data with the Marketo open platform, with capabilities such as REST API, Custom Objects, Custom Activities, etc. – documented here. Not easy to demonstrate via a blog post.
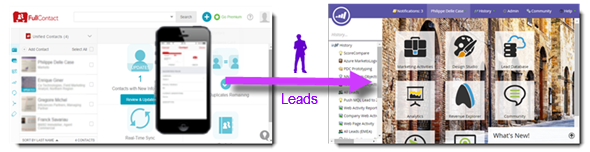
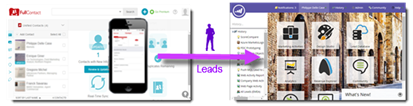
Instead of that, we are going to integrate the IFTTT Service with Marketo in order to implement some cool IoT use cases for the Marketers like:
Cheering up your Marketing team each time a lead is registering to a road show by blinking a colored light in the office
Cheering up your Sales team each time a deal is won by automatically firing up a bell plugged to a connected power plug
Automatically post Marketing success milestones on social networks such as LinkedIn, Facebook, Slack, etc …
Automatically launch a Marketing Campaign based on:
when a weather alert occurs (wind, temperature, rain, etc.)
when a new article is published by a newspaper such as the New York Times, matching some specific criteria
when the U.S. Senate or House of Representatives votes
when the International Space Station passes over a certain location
etc …
You might find those scenarios fun but useless, but they are here to demonstrate a new conceptual way to do Marketing not only with people, but also with things in our connected world.
Another interesting point covered in this article, is how to leverage an open web integration platform such as Zapier as a “serving hatch” between a 3rd party system and Marketo, to manage the authentication for example.
About IFTTT
The IFTTT Service
IFTTT is an acronym for “IF This Then That”. It is a free web-based service that people use to create chains of simple conditional statements, called applets. An applet is triggered by changes that occur within some partner web services and as a result, actions are sent to other partner web services. IFTTT was launched on 2011 by Linden Tibbets, Jesse Tane, Scott Tong, and Alexander Tibbets in San Francisco.
At first sight, IFTTT looks similar to a service like Zapier for example, it has a much stronger focus on consumers and IoT devices (remotes, alarms, lights, thermostats, cars, printers, mobile phones, and so much more).
First of all, you must create an account for IFTTT from the IFTTT web site. Feel free to discover all the cool applets already available as that will give you some other scenarios ideas for sure!
The Maker Channel
A web application that does not have a channel, meaning a partnership with IFTTT, must use the Maker Channel. With the Maker Channel, you can create Applets that work with any device or app that can make or receive a web request. It offers the following integrations:
Inbound Triggers to receive web request from a 3rd party system in order to trigger an action
Outbound Actions to make a web request to a 3rd party system publicly accessible on the Internet
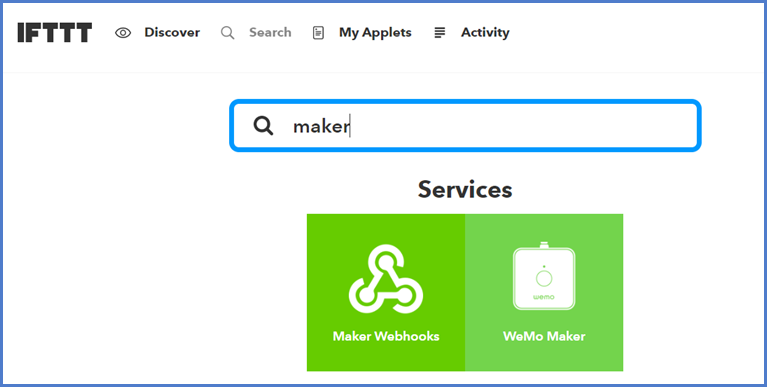
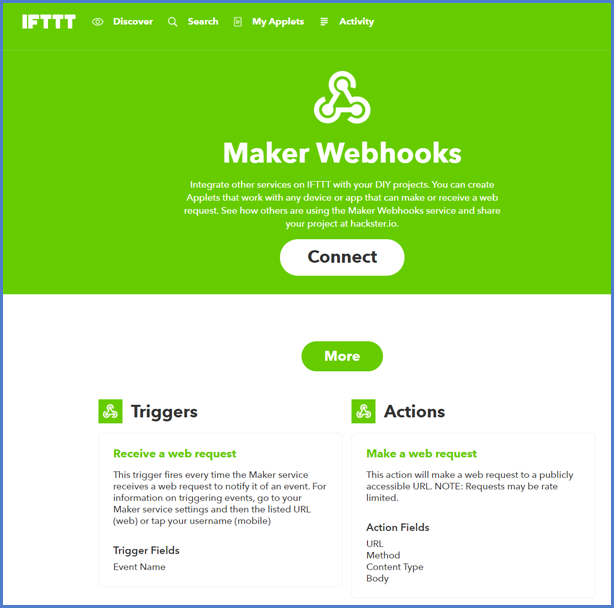
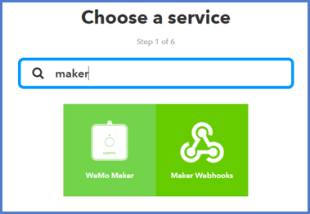
From IFTTT, search for the “Maker” service and click on it.
The first time, you will need to activate it by clicking on the “Connect” button.
Now the Maker Channel is active.
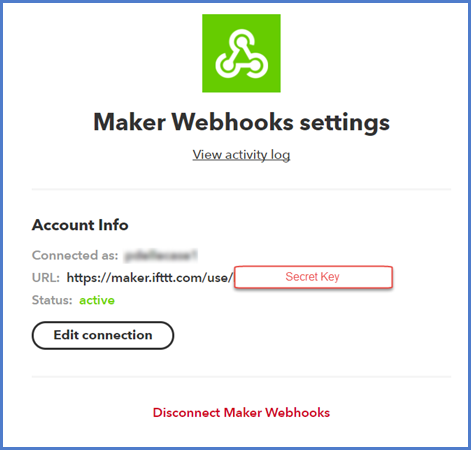
You can obtain your secret key by clicking on the Maker Settings button:
Copy and paste the provided URL to your browser for more details.
Triggering Directly an IFTTT Action from Marketo
First, we are going to focus on triggering all kinds of 3rd party web service actions from Marketo. For that we are going to use a Marketo Webhook. We’ll start with a push message on your mobile phone or tablet via the IFTTT mobile app, and then we’ll implement a IoT scenario blinking a Philips Hue light.
Marketo Webhook
To trigger an event from Marketo, acting as the “if” of IFTTT, is simple. All you need to do is send a POST web request to IFTTT with an event name and your secret key, following this pattern URL:
secret_key, use the secret key from your IFTTT Maker Service
Use static text or Marketo tokens for the three available values. You can push more interactive messages by defining your own tokens at the program level and pass them through these values.
Request Type: POST
Template: Leave blank
Request Token Encoding: Form/Url
Response type: None
No need to define a response mapping.
IFTTT Applet
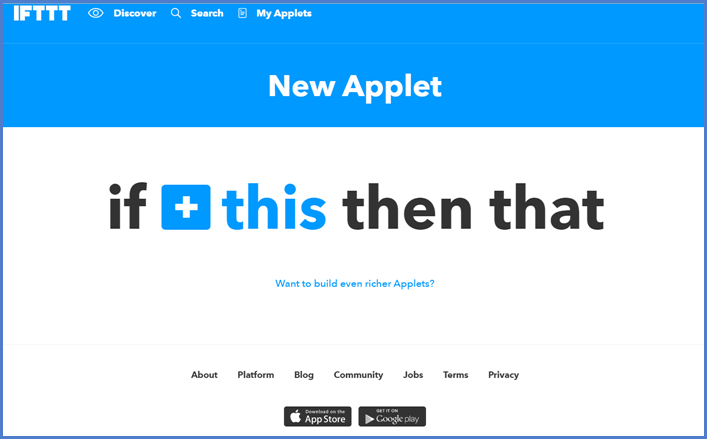
In IFTTT web portal, select “My Applets” in the main menu.
Click the button “New Applet” and click on the section +this.
Search for the Maker service.
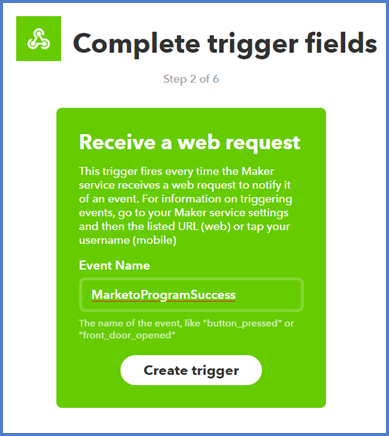
Create the Trigger that will fire every time the Maker service receives a web request to notify it of an event.
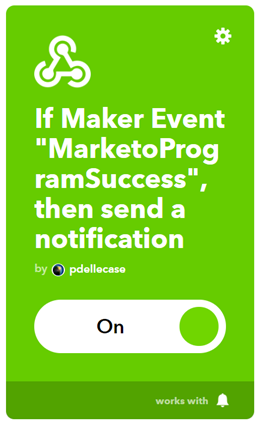
Use the same Event Name as the one specified in the URL of your Marketo Webhook, e.g. “MarketoProgramSuccess” and click the “Create trigger” button.
Now it is time to specify the Action Service by clicking the section +that.
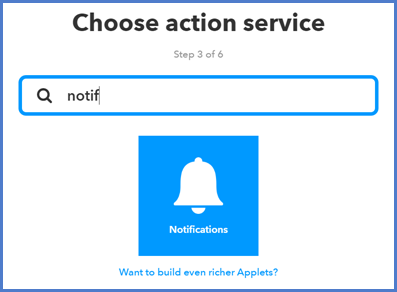
We are going to start with a simple action service that anyone would be able to test without having to invest in any IoT devices, the Notifications Service.
Search for and select the Notifications Service.
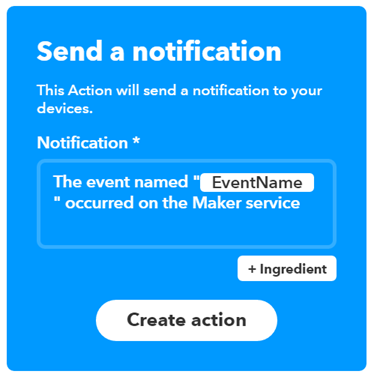
Choose the action “Send a notification” that will send a notification to your devices.
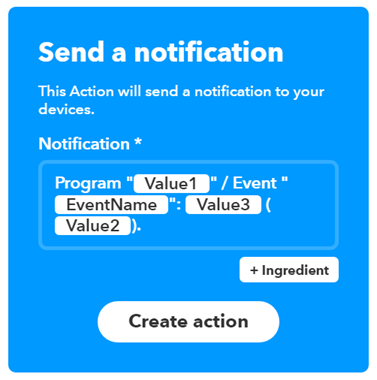
You can leverage the 3 values you have sent from Marketo by adding them as Ingredients in order to deliver a meaningful notification to the user, just like the example below …
And then click the button “Create action”.
Review and finish the IFTTT Applet. Make sure it is enabled.
Testing the IFTTT Applet
If you want to get notified on your Mobile, you must first download the IFTTT app for your device.
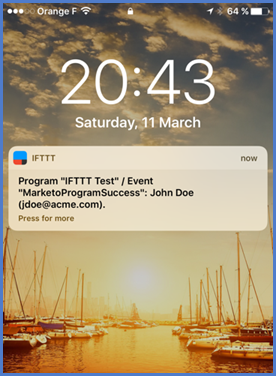
You can trigger a Marketo Program Success event by using the Webhook in a Marketo Smart Campaign Flow. Remember that Marketo Webhooks work exclusively with triggered Smart Campaigns (e.g. trigger once a contact filled-out form, was added to a list, etc.).
And here is an example of an IFTTT notification on your mobile phone.
Let’s Get Creative with IFTTT
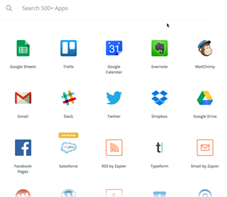
IFTTT offers Applet Actions with over 300 partners, so your portfolio of apps and appliances together with your imagination are the limits …
Let’s take an example with the Hue lights from Philips that you can buy anywhere in electronics shops or online.
The following applets would blink one of your lights with its current assigned color when Marketo triggers a program success, that could boost your marketing team in the office.
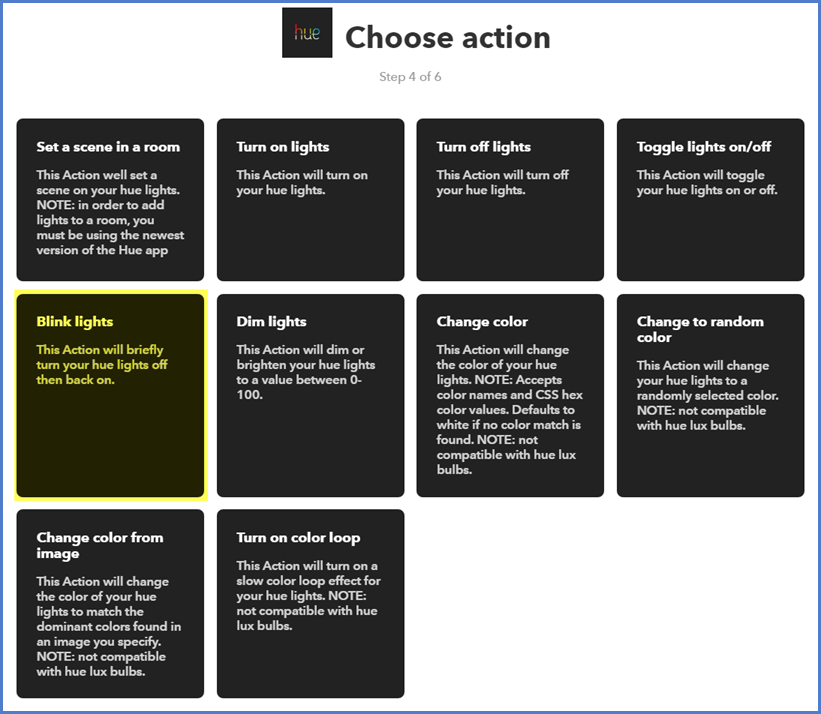
We create a new Applet, following the same steps as before, where Marketo is triggering with a webhook, but this time we choose the action from Philips Hue service.
Let’s select the “Blink lights” action.
The app will request from Philips Hue all your available lights, so you can pick the one to blink. You would need to set up an account with Philips Hue first, the Hue bridge and of course at least one Hue bulb, light strip, projector or lamp.
We just added a new Applet that will blink a colored light each time a lead is registering to a roadshow or webinar. Your Marketing team will cheer up every day with that setup in the office.
Executing a Marketo Action from IFTTT, via Zapier
Now, we are going to trigger a Marketo Smart Campaign from the IFTTT Platform. For that we are going to use the Marketo REST API. Since this API is secured and requires an OAuth2 Authentication prior to invoke anything, we need to handle that authentication via another platform such as Zapier, because IFTTT doesn’t allow to chain two consecutive calls on an API with the Maker Channel.
We picked Zapier web app Automation Service since we published already this blog post introducing Zapier and explaining step by step how to implement a custom Marketo connector for Zapier. Other platforms such as Workato could be a solution too.
Marketo Campaign
Create your Marketo Program with a scheduled Smart Campaign.
For test purpose, you could create the following Smart Campaign as an example:
Smart List
Use only filters, not triggers. Make sure at least you would qualify.
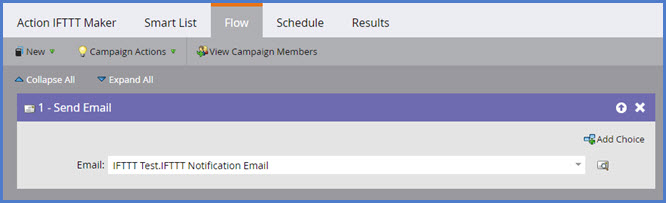
Flow
Send you an email or any another kind of notification.
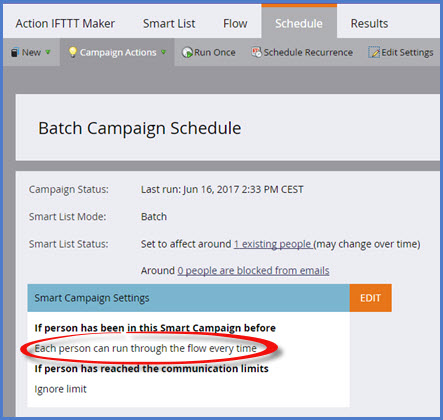
Schedule
Make sure you can run through the flow every time in order to handle your multiple tests.
You can obtain the Smart Campaign Id from the URL. Example: https://{{marketo_url}}/#SC4289A1 – the Smart Campaign Id would be 4289.
You can trigger this campaign via the Marketo REST API. You can use for example the Postman plugin for Chrome and send the 2 following consecutive HTTPS calls:
Intermediate Zapier Custom Connector to Launch the Marketo Campaign
We need to build a custom Zapier connector that authenticates with the Marketo REST API and kicks off our Smart Campaign. For that we are re-iterating all the following steps from our previous article ‘Seamless Integration with Marketo and over 500 Apps using Zapier’:
Prerequisites
Implementation of the Marketo Connector for Zapier
Use a different title such as “Marketo Campaign”
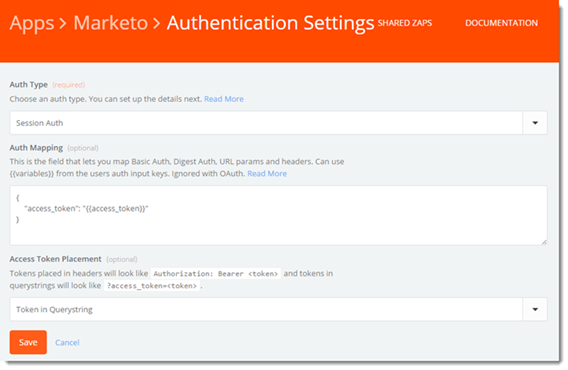
Do the “Authentication” step
Do the “Triggers” step (required for Zapier testing purpose)
Do the following specific “Actions” step, responsible to launch a Marketo campaign, explained below:
Action
Click Add New Action to start the wizard and fill-up the following fields (fields not mentioned can be left blank):
Zapier’s scripting feature allows you to manipulate the requests and responses that are exchanged between your app’s API and Zapier. You can modify HTTP requests just before they are sent and can parse responses before Zapier does anything with them. We need it in order to complete our custom ‘Session Auth’ authentication. More information is available on the original article.
Copy the following code very similar to the original, we just changed the action methods:
var Zap = {

 get_session_info: function(bundle) {

 console.log('Entering get_session_info method ...');

 var access_token,
 access_token_request_payload,
 access_token_response;


 // Assemble the meta data for our Access Token swap request
 console.log('building Request with client_id=' + bundle.auth_fields.client_id + ', and client_secret=' + bundle.auth_fields.client_secret);
 access_token_request_payload = {
 method: 'POST',
 url: 'https://' + bundle.auth_fields.munchkin_account_id + '.mktorest.com/identity/oauth/token',
 params: {
 'grant_type' : 'client_credentials',
 'client_id' : bundle.auth_fields.client_id,
 'client_secret' : bundle.auth_fields.client_secret
 },
 headers: {
 'Content-Type': 'application/json', // Could be anything.
 Accept: 'application/json'
 }
 };

 // Fire off the Access Token request.
 access_token_response = z.request(access_token_request_payload);

 // Extract the Access Token from returned JSON.
 access_token = JSON.parse(access_token_response.content).access_token;
 console.log('New Access_Token=' + access_token);

 // This will be mixed into bundle.auth_fields in future calls.
 //bundle.auth_fields.access_token=access_token;
 return {'access_token': access_token};
 },

 test_trigger_pre_poll: function(bundle) {

 console.log('Entering test_trigger_pre_poll method ...');

 bundle.request.params = {
 'access_token':bundle.auth_fields.access_token
 };

 return bundle.request;

 },

 test_trigger_post_poll: function(bundle) {

 console.log('Entering test_trigger_post_poll method ...');

 var data = JSON.parse(bundle.response.content);
 if ((!data.success)&&((data.errors[0].code=="601")||(data.errors[0].code=="600"))){
 console.log('Access Token expired or invalid, requesting new one - data.success=' + data.success + ', data.errors[0].code=' + data.errors[0].code);

 throw new InvalidSessionException(); // Calling get_session_info() to regenerate Access Token
 }

 return JSON.parse(bundle.response.content);
 },

 launch_campaign_pre_write: function(bundle) {

 bundle.request.params = {'access_token':bundle.auth_fields.access_token};
 return bundle.request;
 },

 launch_campaign_post_write: function(bundle) {

 var data = JSON.parse(bundle.response.content);
 if ((!data.success)&&((data.errors[0].code=="601")||(data.errors[0].code=="600"))){
 console.log('Access Token expired or invalid, requesting new one - data.success=' + data.success + ', data.errors[0].code=' + data.errors[0].code);
 throw new InvalidSessionException(); // Calling get_session_info() to regenerate Access Token
 }
 return JSON.parse(bundle.response.content);
 }

};
New Zap
From the Zapier Dashboard click the button “Make a new Zap”.
Trigger
Pick the “Webhooks by Zapier” Trigger App
Check “Catch Hook”
No need to pick off a child key
Zapier generated a custom webhook URL for you to send requests to, keep it safe somewhere
Test the webhook URL, by starting the “IFTTT Applet that calls the Zapier Webhook” scenario below. That will allow Zapier to learn about the webhook payload and to let you assign the campaign Id to the Action
Action
Select the Marketo Campaign connector previously created
Choose the only action available: Launch Campaign
Connect to your Marketo account, filling up the authentication parameters (Munchkin Account Id, Client Id, Client Secret)
Edit the Template and associate the Campaign ID from the Trigger to the “Launch Campaign” Campaign Id parameter
Test the step and check that the Marketo Campaign get launched
IFTTT Applet that Calls the Zapier Webhook
We start with a simple scenario that is easy to test. We pick in IFTTT a Date & Time trigger that will kick off the Marketo Campaign every hour.
The Action is a web request posting to the Zapier Webhook URL and passing over the Smart Campaign Id.
Make sure the Zapier Zap and the IFTTT Applet are both active and test everything is working as expected.
Let’s get Creative with IFTTT
IFTTT offers Applet Triggers with over 300 partners, so again your portfolio of apps and appliances together with your imagination are the limits …
Let’s take an example with the Weather Underground service that we are going to use to launch our Marketo campaign on weather alert.
The following trigger would kick-off when a Rain condition is announced.
And then associate the Trigger with the Maker Webhook Action, and just like previously fill in the Zapier webhook parameters.
Et voila, you just need now a good rain to come to double check this is actually working.
Conclusion
We hope you’ll have a lot of fun applying the concepts provided in this article. But most important, we think it will help anybody wanting to integrate Marketo with other 3rd party systems, thanks to the key concepts from this article:
Marketo REST API
Marketo Webhooks
How to leverage an open web integration platform such as Zapier as a “serving hatch” between a 3rd party system and Marketo, to manage the authentication for example
This is the second in a series of two articles that explain how to leverage the Power BI technology built into Microsoft Excel to create a true self-service business analytics experience with Marketo.
With the concepts covered in these articles, you’ll be able to:
Import data from Marketo into Excel
Import and combine data from other sources (SaaS applications, databases, flat files, etc.)
Shape data for business needs and analysis purposes
Refresh data on demand within Excel
Create calculated columns and measures using formulas
Create relationships between heterogeneous data
Analyze data and build advanced reports with Pivot Tables and Pivot Charts
Produce stunning data visualizations
Here is a short video that highlights all the steps and benefits documented in these two articles:
Power Pivot and Power View for Excel
In this article, we provide examples of how to build the following:
Advanced Marketo reports that leverage relationships between different collections of Marketo data using Power Pivot
Cool static and animated visualizations using Power View
Power Pivot is an Excel add-in, already included in Excel 2016, you can use to perform powerful data analysis and create sophisticated data models. With Power Pivot, you can mash up large volumes of data from various sources, perform information analysis rapidly, and share insights easily. Data extracted from different data sources with Power Query can be sent to the data model, to the Excel spreadsheet, or to both. In the first article, we imported and shaped data from Marketo and sent it to the data model in order to perform more sophisticated analysis prior to making it available on the spreadsheet.
Power View is an alternative to the Excel visualization layer. It is an interactive data exploration, visualization, and presentation experience that encourages intuitive ad-hoc reporting and dashboarding.
All of the steps explained in this article have been tested on Excel 2016 for Windows. The concepts should be the same for Excel 2013 or Excel 2010 (without Power View) but some adaptations could be required. Power Pivot and Power View are currently only available on the Microsoft Windows version of Excel 2016, the Office 365 version of Excel 2016 does not support fully Power Pivot and Power View.
The Marketo Power Workbook
Download Workbook
In the first article, we covered the data import and shaping process using Power Query technology. We learned how to implement some advanced power queries in order to extract leads and activities from Marketo. Because some of you would want to jump directly to the point where they build reports and visualisations, without coding, we released the Marketo Power Workbook that you can download here.
This workbook contains all the queries detailed in the first article and a few more. We improved the error handling and added some extra parameters in the configuration worksheet. If you went through the first article, we still recommend you to download the Marketo Power Workbook and check out what has been added.
Disclaimer: The Marketo Power Workbook is not official Marketo Product, and therefore is not supported by by Marketo. Feel free to use and expand for your personal business needs, but do so at your own risk.
Configure Workbook
Please check out the Prerequisites and the Power Query Workbook Creation sections from the first article in order to understand the prerequisites and how to configure the Marketo configuration worksheet.
Fill in all of the required information from the Marketo configuration worksheet:
Marketo REST API Authentication: required
Scoping: set the Paging Token SinceDatetime and the Id of your Marketo static list containing all the leads you want to analyze
Leads: for the reports to come, you must at least specify the following Lead fields: id, firstName, lastName, email, createdAt, updatedAt, title, company, industry, inferredCountry, inferredCity
If the city information is more accurate in one of your custom fields, then you can use your own field instead
Activities: Activity types to fetch from the Marketo database are specified here for each Activity set, no need to change this now.
Note that we provided a utility query on the workbook that lists, right on the Excel workbook, all the existing Activity types if you want to adjust this information later on
Note that you may see some security related pop-ups. Trust external connections and set them to ‘Public’.
If you see the pop-up below, stay with ‘Anonymous’ web access content. The authentication to Marketo is directly managed by our custom queries, so no need to enable any other kind of access.
Download Marketo Data
Make sure first that the parameter you define in the Scoping area of the Marketo configuration worksheet will not result in downloading too much data, exceeding your Marketo API daily request limit (see first article).
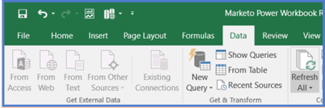
When ready, click the ‘Refresh All’ button from the ‘Data’ menu and wait that all the data is downloaded into the workbook.
If formatting error messages are displayed when downloading the data, similar to ‘column1 not found’, that means one or more queries are failing to get the data, so the formatting is also failing. Try again later on, if the error persists, then check your version of Excel (do not use Excel 2016 from Office 365).
It is important also to respect the latency from the Marketo platform. If you do any changes in a static list, or in your lead data, then it is preferable to wait before launching the Power Queries.
Data Modeling in Power Pivot
Open Power Pivot by clicking the ‘Manage’ button from the Power Pivot menu, available in the top menu bar (if not available check your version of Excel, Power Pivot can be installed as an add-in in some versions of Excel).
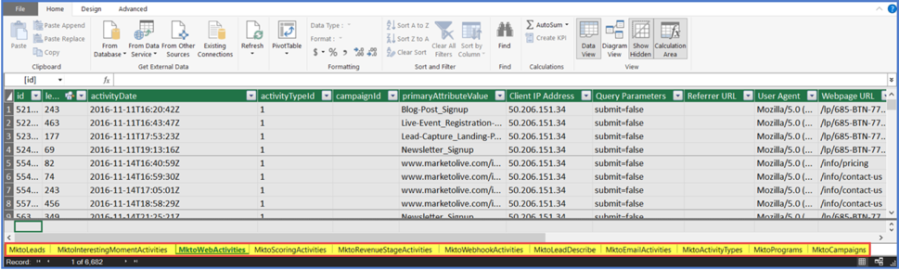
All the data downloaded from Marketo and sent to the data model should be accessible from the different tabs at the bottom of the Power Pivot window.
Data Analysis Expressions (DAX)
We need to enrich or reformat the data for some reports. Let’s use Power Pivot Data Analysis Expressions (DAX) to define some custom calculations as calculated columns and measures (also known as calculated fields). See the ‘DAX in Power Pivot’ link in the References section to learn more about DAX.
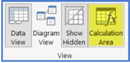
Make sure the Calculation Area is showing in the Power Pivot window; if not, enable it from the Power Pivot Home menu.
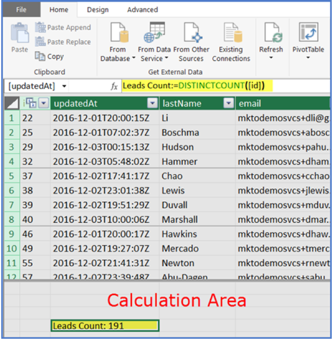
Select the MktoLeads tab and add the Leads Count measure anywhere in the Leads Calculation Area: Leads Count:=DISTINCTCOUNT([id]).
This measure is counting the distinct leads available in the list, based on their id. It would also take into account the eventual filters in place in the context of a report.
This measure is not really necessary since the reports are capable of summing up the number of leads but we did it in order to have a lead count with a nicer name than ‘sum of MktoLeads’. It is also a simple example that let you easily imagine some more complex measures doing averages, min, max for a specific type of data entry (e.g. all the leads with a score higher than 50, average score, etc …).
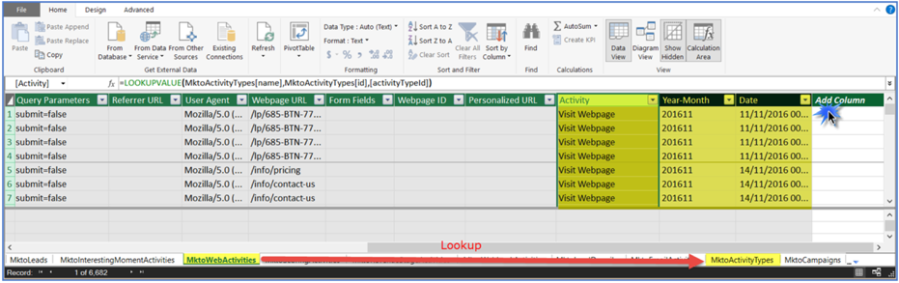
Now let’s select the MktoWebActivities tab and create three calculated columns.
Insert the following calculated columns by scrolling to the far right of the table and by clicking the column ‘Add Column’.
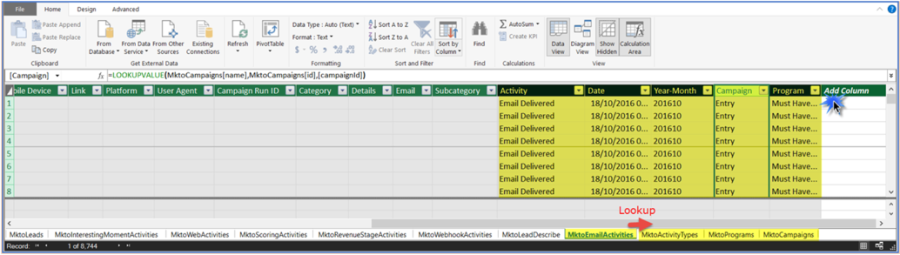
Activity: Obtain the user-friendly Activity label by looking up the Activity Id in the table MktoActivtyTypes.
Program: Obtain the user-friendly Program name by looking up the Campaign Id in the table MktoCampaigns. The table MktoPrograms can provide more details about the Program such as folder, workspace, etc.
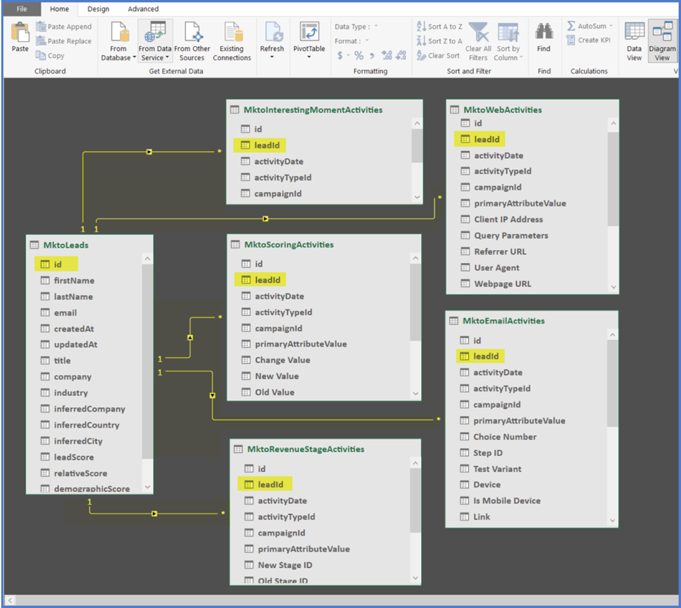
We saw previously a way to lookup information from another table within the model in order to complete some missing information. Power Pivot offers a more powerful option to define the relationships between some tables of the data model, allowing us to leverage those relationships directly from the reports. Let define the key relationships for our reports.
Select the Diagram View from the Power Pivot window.
Trace the following relationships within the Data model diagram:
We’ll not use all of these relationships and objects in our reports, only the Leads, Web Activities and Email Activities.
Now it’s time to build some reports.
Emails Performance Pivot Chart
This first report is showing email performance KPIs based on a standard Excel Pivot Chart. It allows us to filter data by Industry and/or Campaign.
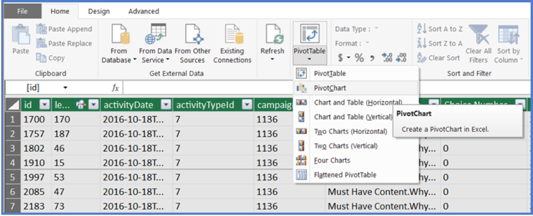
You can create a Pivot Chart right from the Power Pivot menu by selecting ‘Pivot Chart’ from the ‘Pivot Table’ selector.
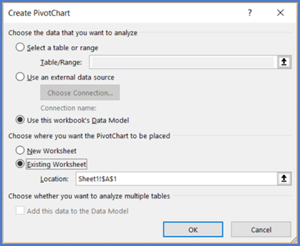
An alternative is to create a Pivot Chart directly from the Excel spreadsheet, ticking the option ‘Use this workbook’s Data Model’.
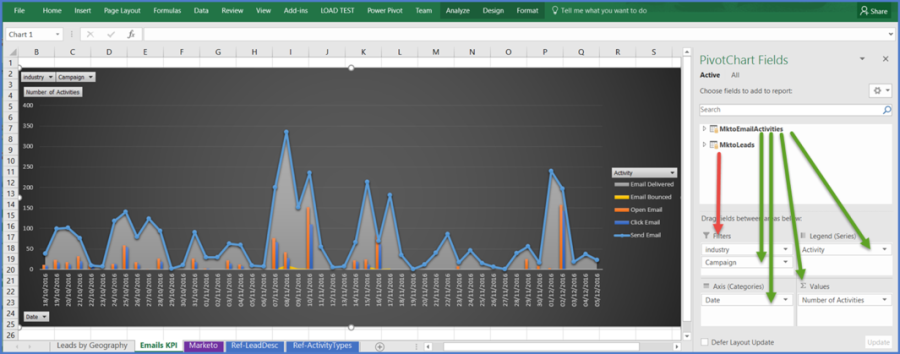
Drag and drop the fields from the MktoEmailActivities and the MktoLeads tables, like the figure below:
MktoEmailActivities.Activity → Legend (this use the DAX calculated column we implemented on MktoEmailActivities earlier)
MktoEmailActivities.Date → Axis (this use the DAX calculated column we implemented on MktoEmailActivities earlier)
MktoEmailActivities.Id →∑ Values
MktoEmailActivities.Campaign → Filter
MktoLeads.industry → Filter
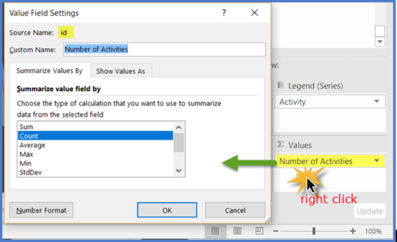
You can create custom name by selecting ‘Value Field Settings’ on each dropped field. In this case, we dropped the Email Activity id field into the ‘∑ Values’ section and edited its custom name as ‘Number of Activities’.
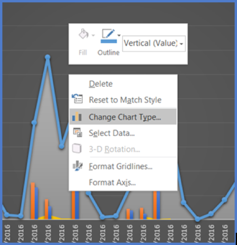
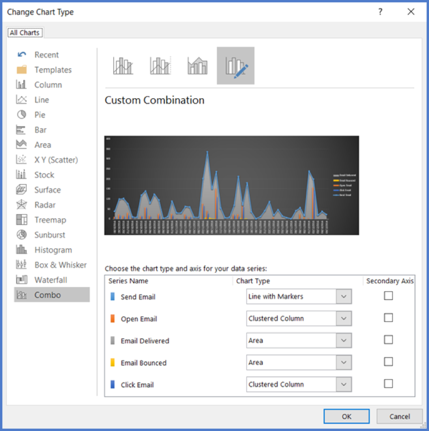
Now let’s configure the Pivot Chart. Right click directly on the chart and select the ‘Change Chart Type’ option in the contextual menu.
And this is how we selected the different chart type for all data series.
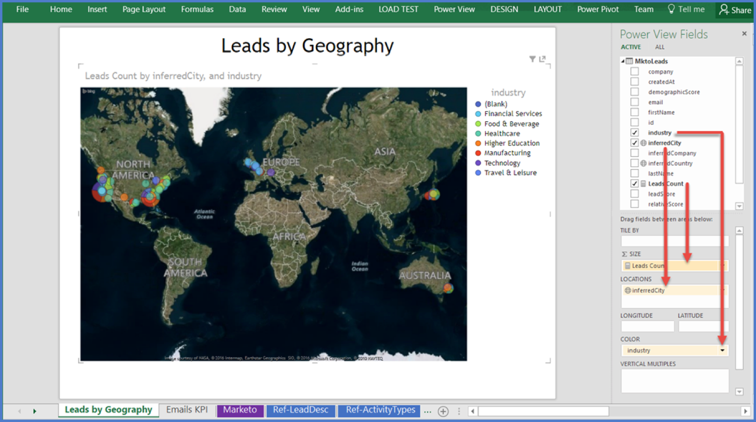
Leads Map with Power View
The second report displays your Leads and Contacts by geography on a world map and by Industry.
We’ll need Power View for this report. Please follow the reference link below ‘Turn-on Power View in Excel 2016’ in order to turn on the menu in Excel. Or you can just type ‘power view’ in the Excel search box.
Select ‘Insert a Power View Report’.
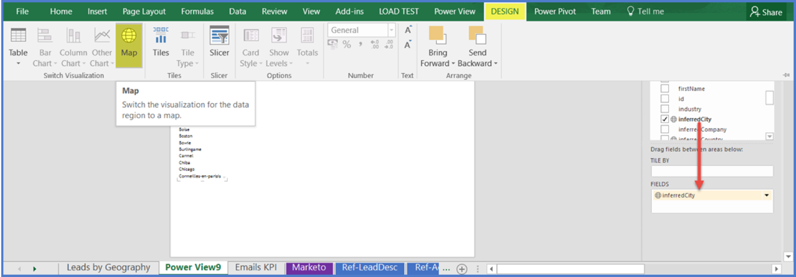
On the blank Power View report, select the MktoLeads table on the right panel and drag & drop the lead location field (e.g. inferredCity). Now the menu ‘Design’ appear in the main menu.
Switch to the Map visualization by selecting ‘Map’ in the Power View ‘Design’ menu.
Drag and drop the fields from the MktoLeads table, like the figure below:
MktoLeads.industry → Color
MktoLeads.inferredCity → Locations
MktoLeads.Leads Count →∑ Size (this use the DAX measure we implemented on MktoLeads earlier)
And your Leads map is ready! You just need to adjust the size of the map, customize the title and legends.
Power View allows you to build advanced dashboards with multiple graphs on one single spreadsheet. Check out the referenced tutorial below ‘Create Amazing Power View Reports’ to see how to proceed with more dashboard components with Power View.
Web Activities Animated on a 3D Map
This third report displays your Lead web activities, by industry, on a 3D world map.
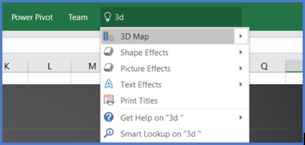
We’ll need a 3D Map for this report. Just type ‘3D’ in the Excel search box and select ‘3D Map’.
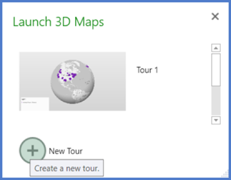
Create a new tour from the pop-up window.
Select the Bubble Chart on the right panel.
Drag and drop the fields, from the MktoLeads and the MktoWebActivities tables, like the figure below:
MktoLeads.industry → Category
MktoLeads.inferredCity → Location
MktoWebActivities.Activity → Time (this use the DAX calculated column we implemented on MktoWebActivities earlier. The id field could also be used for counting activities.)
MktoWebActivities.Date → Time (this use the DAX calculated column we implemented on MktoWebActivities earlier)
MktoWebActivities.Activity can also be used as a filter to filter out the different types of web activities.
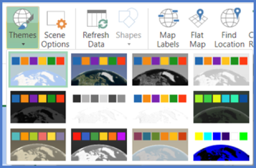
Use the ‘Themes’ button in order to change the color scheme of your 3D Map.
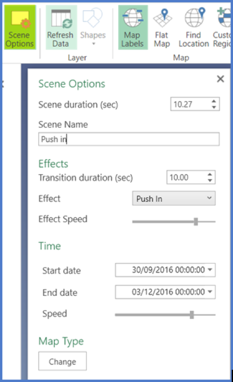
Open the ‘Scene Options’ in order to customize your animations.
And you’re done with the 3D World Map, now you can have fun animating the globe and creating video from it.
Next Steps
We just scratched the surface of what is possible to do with the Excel Power BI tools. We recommend you to search the web for other great articles and tutorials to expand your Excel skills and design the reports you need to achieve your business goals.
We hope you enjoyed these articles and that they helped you leverage the great benefits of Excel and Marketo combined.
This is the first of a series of two articles that explain how to leverage the Power BI technology built into Microsoft Excel to create a true self-service business analytics experience with Marketo.
With the concepts covered in these articles, you’ll be able to:
Import data from Marketo into Excel
Import and combine data from other sources (SaaS applications, databases, flat files, etc.)
Shape data for business needs and analysis purpose
Refresh on demand the data from Excel
Create calculated columns and measures using formulas
Create relationships between heterogeneous data
Analyze data and build advanced reports with Pivot Tables and Pivot Charts
Produce stunning data visualizations
Here is a short video that highlights all the steps and benefits documented in these two articles:
Power Query for Excel
This first article covers the data import and shaping process using Power Query technology. Power Query is a data connection technology that enables you to discover, connect, combine, and refine data sources to meet your analysis needs. Features in Power Query are available in Excel and Power BI Desktop.
Power Query can connect to many data sources such as databases, Facebook, Salesforce, MS Dynamics CRM, etc. Marketo isn’t supported out of the box, but fortunately we can use Marketo REST APIs for remote execution of many of the system’s capabilities, and Power Query comes with a rich set of formulas (informally known as “M”) allowing you to script a custom data source.
Custom Connector
Scripting a single REST API call is trivial with Power Query, but it becomes more challenging to handle the following requirements:
Access token management including authentication mechanism and periodic token refresh
Pagination mechanism for large set of data
Error handling
This article explains how to build a robust custom connector that can consume the REST APIs of Marketo in order to pull all kinds of data (Leads, Activities, Custom Objects, Programs, etc.). Your only restriction will be down to your Marketo API daily request limit.
The concepts explained here focus on Marketo, but they could also be used to to integrate other SaaS solutions that provide a REST API.
Prerequisites
POWER QUERY
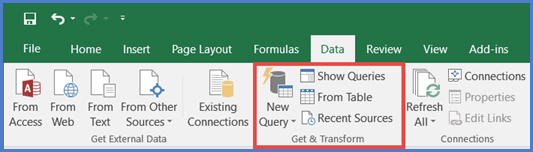
Prior to the release of Excel 2016, Microsoft Power Query for Excel functioned as an Excel add-in that was downloaded and installed on Excel 2010 or Excel 2013. From Excel 2016, this technology is a native feature integrated into the ‘Data’ ribbon under ‘Get & Transform’ section.
All of the scripts produced for this article have been tested on Excel 2016 for Windows. The concepts should be the same for Excel 2013 or Excel 2010 but some adaptations could be required.
Power Query is currently only available on the Microsoft Windows version of Excel; the Mac version is unfortunately not supported.
MARKETO
Power Query will use the Marketo REST APIs to access data from Marketo. In order to use these APIs, you’ll need an API User and a Custom Service that you can create yourself if you are administrator of your Marketo instance. If not, then an administrator will need to provide those to you.
A step by step explanation of how to create the Marketo API User and the Custom Service can be foundhere.
Once you’re done, you should have the following credentials in order to invoke the Marketo REST APIs:Client IdandClient Secret.
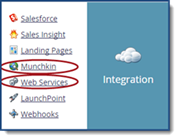
TheREST API Endpointcan be found on the REST API section of the Web Services Admin in Marketo and it should have the following pattern:
Marketo has a Daily Request Limit for its API and this limit can be found in the Web Services Admin along with a consumption report.Make sure to never exceed your daily limit when you design your queries as you may miss some data in your reports.
Power Query Workbook Creation
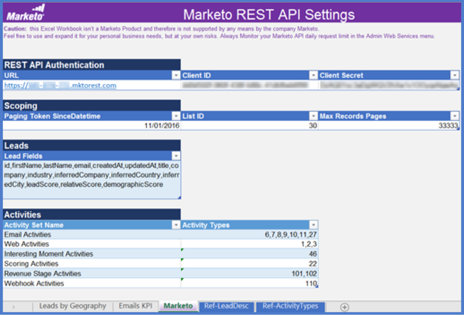
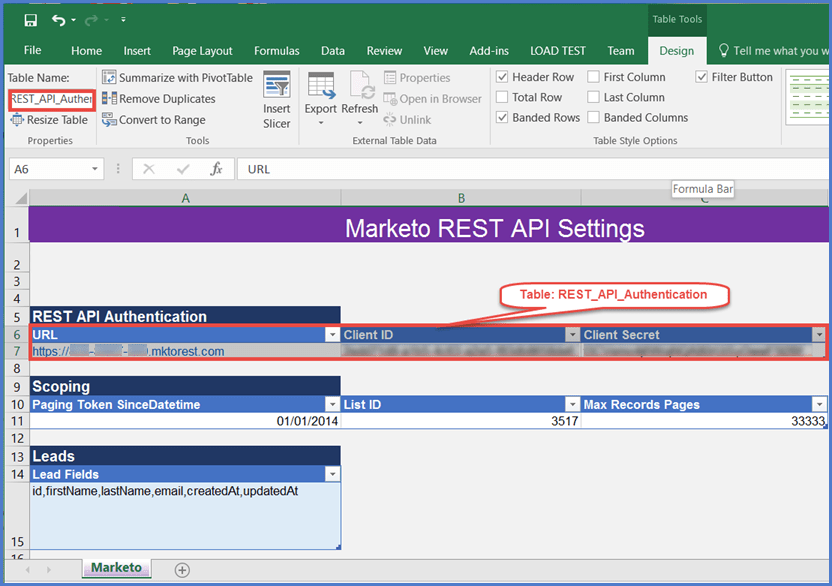
Let start with a new Excel workbook. We create a specific configuration worksheet for declaring all the Marketo REST API Settings.
In this worksheet, we create three tables:
1. Table ‘REST_API_Authentication’ with the columns:
URL: your Marketo REST API Endpoint.
Client ID: from your Marketo REST API OAuth2.0 credential.
Client Secret: from your Marketo REST API OAuth2.0 credential.
2. Table ‘Scoping’ with the columns:
Paging Token SinceDatetime: a date following the ISO 8601 standard date notation (e.g. “2016-10-06T13:22:17-08:00”, “2016-10-06” are valid date/time) that is used to fetch Marketo activities since a given period, thanks to an initial ‘date-based’ paging token. This date is mainly used to limit the amount of data to import into the workbook.
List ID: the ID of a static list in Marketo that reference all the leads/contacts we are dealing with. This static list can be managed freely in Marketo (e.g. a smart campaign can feed it periodically or in real time with leads and contacts). In order to get the ID of a static list, open it in Marketo and get its numerical ID from the URL, e.g. https://myorg.marketo.com/#ST3517A1LA1, List ID=3517.
Max Records Pages: this is used for our pseudo-recursive algorithms that iterates through the Marketo output data, using ‘position-based’ paging tokens, with a capacity of 300 max records per page. Since this our interest to get as many records per page as possible, we’ll stick to 300. So typically a Max Records Pages set to 33.333 means a capacity of 33.333 X 300 = 9.9999 million records; but it also means 33.333 K on your Marketo API Daily Request Limit. The algorithms will stop anyway as soon as all data from the queries are obtained, so this parameter is just a safety limit for a loop.
3. Table ‘Leads’ with the column:
Lead Fields: comma separated lead fields to gather from Marketo when querying the leads and contacts.
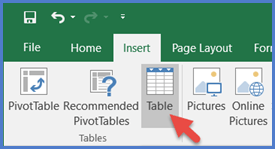
Declaring a table in Excel is simple. Enter two rows in the spreadsheet with the columns names and values, highlight with the mouse the perimeter of the table, and select the icon Table in the ‘Insert’ menu, and then give it a name.
The names given to the tables and their columns are important as they will be called directly by our scripts.
Authentication and Access Token
ABOUT MARKETO REST API AUTHENTICATION
Marketo’s REST APIs are authenticated with 2-legged OAuth 2.0. Client IDs and Client Secrets are provided by custom services that you define. Each custom service is owned by an API-Only user which has a set of roles and permissions which authorize the service to perform specific actions. An access token is associated with a single custom service.
The full Authentication mechanism is documentedhereon the Marketo Developer site.
When an access token is originally created, it’s lifespan is 3600 seconds or 1 hour. Each consecutive authentication call for the same custom service returns the current access token with its remaining lifespan. Once the token is expired, the authentication returns a brand new access token.
Managing access token expiration is important to ensure that your integration works smoothly and prevents unexpected authentication errors from occurring during normal operation.
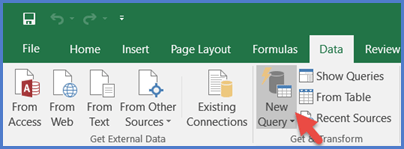
CREATE QUERY
Create a new query by clicking the ‘New Query’ icon from the ‘Get&Transform’ section of the ‘Data’ Menu. Select a blank query to start with and give it a name such as ‘MktoAccessToken’.
Launch the Advanced Editor from the Query Editor, so you can script manually some Power Query formulas.
Enter the following code in the advanced editor:
let
    // Get url and credentials from config worksheet - Table REST_API_Authentication
    mktoUrlStr = Excel.CurrentWorkbook(){[Name="REST_API_Authentication"]}[Content]{0}[URL],
    clientIdStr = Excel.CurrentWorkbook(){[Name="REST_API_Authentication"]}[Content]{0}[Client ID],
    clientSecretStr = Excel.CurrentWorkbook(){[Name="REST_API_Authentication"]}[Content]{0}[Client Secret],

    // Calling Marketo API Get Access Token
    getAccessTokenUrl = mktoUrlStr & "/identity/oauth/token?grant_type=client_credentials&client_id=" & clientIdStr & "&client_secret=" & clientSecretStr,
    TokenJson = try Json.Document(Web.Contents(getAccessTokenUrl)) otherwise "Marketo REST API Authentication failed, please check your credentials",

    // Parsing access token
    accessTokenStr = TokenJson [access_token]

in
    accessTokenStr
The comments embedded in the source code, preceded by “//” make the code self-explanatory. If you need any function reference, please check out the links provided in the Reference section of this article.
Click the button “Done”.
Check that the Access token is displayed successfully in output for the final applied step ‘accessTokenStr’.
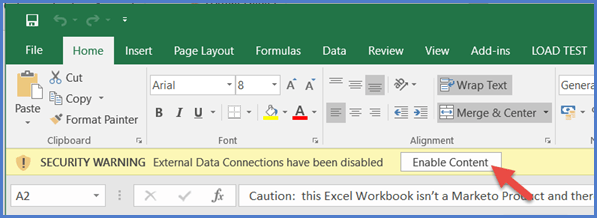
One quick comment about the security in Excel; you may be asked occasionally to enable External Data Connections from the yellow banner. This is required in order to let the Queries work properly.
CONVERTING QUERY INTO A FUNCTION
Return to the advanced Editor and wrap your code with the following function declaration:
let
    FnMktoGetAccessToken =()=>

        let
            // Get url and credentials from config worksheet - Table REST_API_Authentication
            mktoUrlStr = Excel.CurrentWorkbook(){[Name="REST_API_Authentication"]}[Content]{0}[URL],
            clientIdStr = Excel.CurrentWorkbook(){[Name="REST_API_Authentication"]}[Content]{0}[Client ID],
            clientSecretStr = Excel.CurrentWorkbook(){[Name="REST_API_Authentication"]}[Content]{0}[Client Secret],

            // Calling Marketo API Get Access Token
           getAccessTokenUrl = mktoUrlStr & "/identity/oauth/token?grant_type=client_credentials&client_id=" & clientIdStr & "&client_secret=" & clientSecretStr,
           TokenJson = try Json.Document(Web.Contents(getAccessTokenUrl)) otherwise "Marketo REST API Authentication failed, please check your credentials",

            // Parsing access token from Json
           accessTokenStr = TokenJson [access_token]

        in
            accessTokenStr

in FnMktoGetAccessToken
The function does not take any parameters in input but get those from the configuration worksheet. It produces the access token as an output.
Rename your queryFnMktoGetAccessTokenand save it.
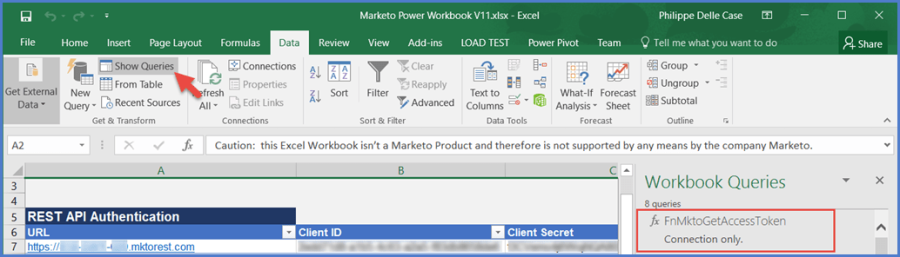
Note that you can see all your queries at any time in Excel by clicking the button ‘Show Queries’ in the ‘Get & Transform’ section of the Data menu.
Your function should be now marked with the function icon ‘Fx’, just like in the screenshot below:
Load Members of Static List
GET LEADS
The Marketo Lead API provides simple CRUD operations against lead records, the ability to modify a lead’s membership in static lists and programs, and initiate Smart Campaign processing for leads. All these capabilities are documentedhere.
A large set of lead records can be retrieved based on membership in a static list or a program. Using the id of a static list, you can retrieve all lead records which are members of that static list. The id of the list is a path parameter in the call. See the chapter “List and Program Membership” in the Marketo Developers documentation for details.
The maximum number of lead records we can get per API call is 300, so we’ll need to leverage paging tokens in order to gather the records per pages of 300 records. We get the paging token in the Json answer after the first call and we know we’re done when the paging token is not in the output anymore.
BASIC QUERY
Let’s get started with a fully functioning query aimed at downloading all the leads from a static list.
Create a new blank query called ‘MktoLeads’ and enter the following code in the advanced editor:
let

    // Get Url from config worksheet - Table REST_API_Authentication
    mktoUrlStr = Excel.CurrentWorkbook(){[Name="REST_API_Authentication"]}[Content]{0}[URL],
    // Get the number of iterations (pages of 300 records) - Table Scoping
    iterationsNum = Excel.CurrentWorkbook(){[Name="Scoping"]}[Content]{0}[Max Records Pages],
    // Get the List id - Table Scoping
    listIdStr = Number.ToText(Excel.CurrentWorkbook(){[Name="Scoping"]}[Content]{0}[List ID], "D", ""),
    // Get the Lead fields to extract - Table Leads
    LeadFieldsStr = Excel.CurrentWorkbook(){[Name="Leads"]}[Content]{0}[Lead Fields],


    // Build Multiple Leads by List Id URL
    getMultipleLeadsByListIdUrl = mktoUrlStr & "/rest/v1/list/" & listIdStr & "/leads.json?fields=" & LeadFieldsStr,

    // Build Marketo Access Token URL parameter
    accessTokenParamStr = "&access_token=" & FnMktoGetAccessToken(),

    pagingTokenParamStr = "",

    // Function iterating though the pages
    FnProcessOnePage =
    (accessTokenParamStr, pagingTokenParamStr) as record =>
        let

            // Send REST API Request
            content = Web.Contents(getMultipleLeadsByListIdUrl & accessTokenParamStr & pagingTokenParamStr),

            // Recover Json output and watch if token is expired, in that case, regenerate access token
            newAccessTokenParamStr = if Json.Document(content)[success]=true then accessTokenParamStr else "?access_token=" & FnMktoGetAccessToken(),
            getMultipleLeadsByListIdJson = if Json.Document(content)[success]=true then Json.Document(content) else Json.Document(Web.Contents(getMultipleLeadsByListIdUrl & newAccessTokenParamStr & pagingTokenParamStr)),

            // Parse Json outputs: data and next page token
            data = try getMultipleLeadsByListIdJson[result] otherwise null,
            next  = try  "&nextPageToken=" & getMultipleLeadsByListIdJson[nextPageToken] otherwise null,
            res = [Data=data, Next=next, Access=newAccessTokenParamStr]
        in
            res,

    // Generates a list of values given four functions that generate the initial value initial, test against a condition, and if successful select the result and generate the next value next. An optional parameter, selector, may also be specified
    GeneratedList =
        List.Generate(
            ()=>[i=0, res = FnProcessOnePage(accessTokenParamStr, pagingTokenParamStr)],
            each [i]null,
            each [i=[i]+1, res = FnProcessOnePage([res][Access],[res][Next])],
            each [res][Data])
in
    GeneratedList
Power Query does not offer traditional looping functions (e.g. For-loop, While-loop) and does not support recursion. A good workaround is to implement a For-loop using List.Generate. This function is documentedhere. With List.Generate it’s possible to iterate over the pages. At each step of the iteration we extract a page of data, keeping the URL that includes the paging token for the next page, and store the results in the next item of the generated list. The blog fromDatachantwas a great resource for solving this. Our parameter ‘Max Records Pages’ is here to limit the number of pages and restrict it to a realistic range avoiding an infinite loop.
Another challenge is to ensure that the access token is never expired. Tracking its remaining lifespan would be too complex with Power Query. So all calls to the REST API are backed up with an error check; if an error occurs, we assume the token has expired and we renew it first and replay the call again. If the second call fails, then the second failure will be notified to Excel (in the worst case, you’ll get no data as a result).
Launch the query, after saving it or by clicking the ‘Refresh button’ at any time.
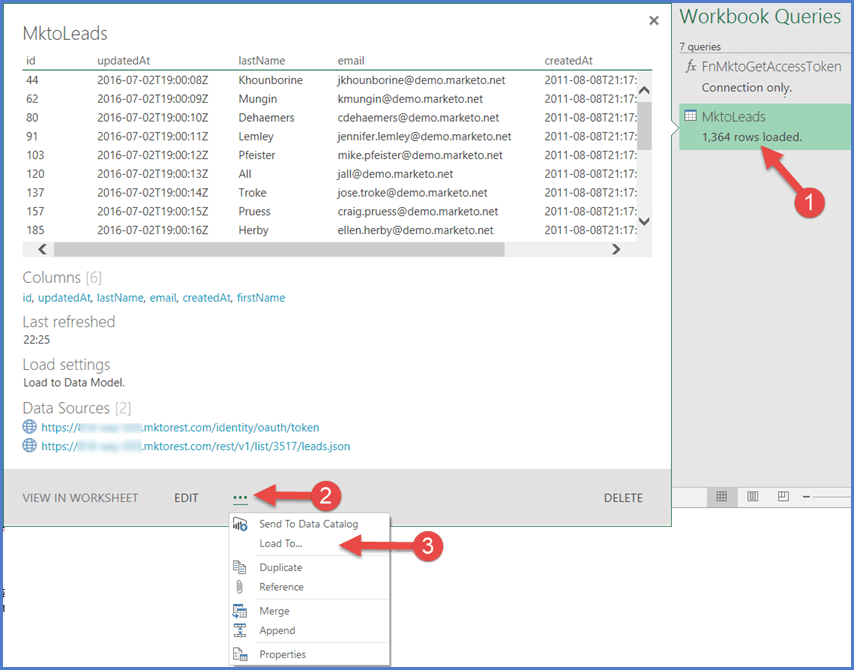
In our case, 1364 lead records were extracted fitting in 5 pages of data within 5 lists.
Shaping the Data
We need to shape the data to have all these records in a single flat list of records. There are two ways to do this:
Using more code
Leverage the Power Query UI
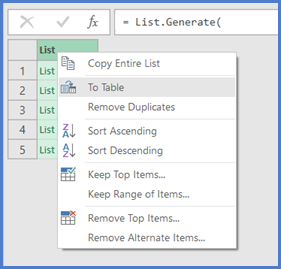
Right click on the output grid and choose ‘To Table’ in the contextual menu in order to convert it to a table of lists.
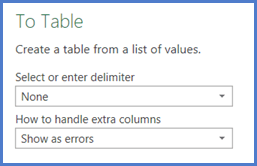
In the ‘To Table’ pop up, leave the default values in the 2 picklists.
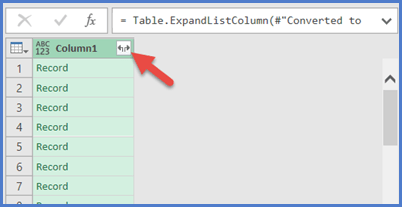
Now expand the resulting table of lists.
Now we have all the records in a single list. The records encoded in Json format contain the fields and their associated values. Expand again.
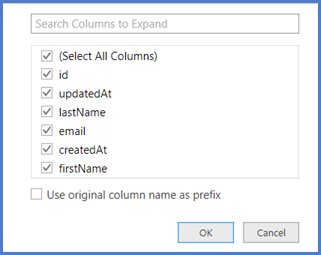
Select in the pop up all the fields you want to keep, uncheck the tick box ‘Use original column name as prefix’.
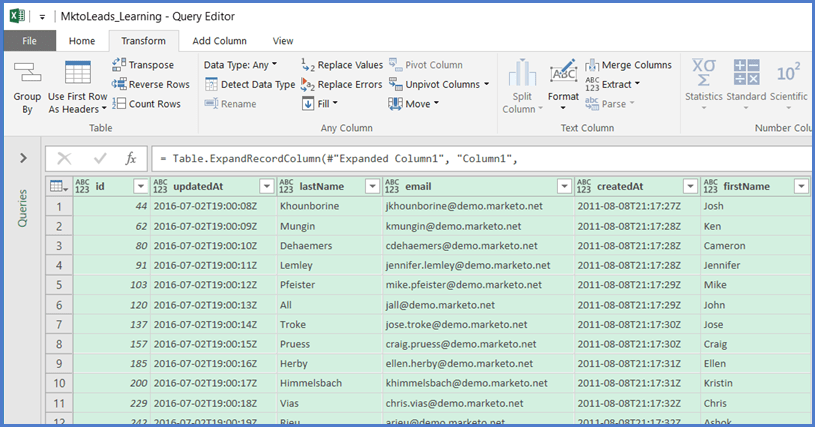
Et voila! All records are displayed nicely in our table.
If we re-open the advanced editor, we can see that 3 lines of code have been added to shape our data:
You can do much more with Power Query, like creating extra columns with computed values, we’ll see some more possibilities later on.
Let’s save and close this query. It can now be refreshed manually at any time or automatically via background refreshes.
Redirecting the Results
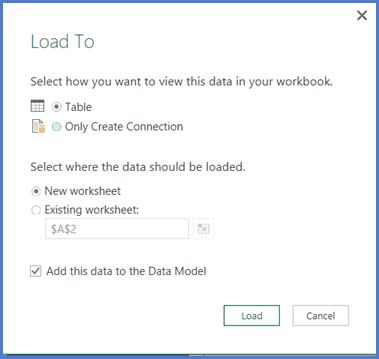
Now the question is, where to send the result data?
Hover over your query with the mouse and select the menu ‘Load To…’ in the contextual menu.
In the popup, then you can select:
‘Table’ if you want to send all the shaped data to a worksheet (new or existing one),
‘Only Create Connection’ if your goal is to do further analysis in the Power Pivot.
The check box ‘Add this to the Data Model allows you to exploit the data in the Power Pivot; this is what we want for the second part of this article.
Managing Pagination
Since the aim of our project is to build many more queries, let’s do some refactoring and extract a reusable function that would manage the pagination.
Create a new blank query calledFnMktoGetPagedDataand enter the following code in the advanced editor:
let
    FnMktoGetPagedData =(url, accessTokenParamStr, pagingTokenParamStr)=>

    let

        // Get the number of iterations (pages of 300 records) - Table Scoping
        iterationsNum = Excel.CurrentWorkbook(){[Name="Scoping"]}[Content]{0}[Max Records Pages],

        // Sub-function iterating though the REST API service result pages
        FnProcessOnePage =
        (accessTokenParamStr, pagingTokenParamStr) as record =>
            let

                // Send REST API Request
                content = Web.Contents(url& accessTokenParamStr & pagingTokenParamStr),

                // Recover Json output and watch if token is expired, in that case, regenerate access token
                newAccessTokenParamStr = if Json.Document(content)[success]=true then accessTokenParamStr else "?access_token=" & FnMktoGetAccessToken(),
                contentJson = if Json.Document(content)[success]=true then Json.Document(content) else Json.Document(Web.Contents(url & newAccessTokenParamStr & pagingTokenParamStr)),

                // Parse Json outputs: data and next page token
                data = try contentJson[result] otherwise null,
                next  = try  "&nextPageToken=" & contentJson[nextPageToken] otherwise null,
                res = [Data=data, Next=next, Access=newAccessTokenParamStr]
            in
                res,

        // Generates a list of values given four functions that generate the initial value initial, test against a condition, and if successful select the result and generate the next value next. An optional parameter, selector, may also be specified
        GeneratedList =
            List.Generate(
                ()=>[i=0, res = FnProcessOnePage(accessTokenParamStr, pagingTokenParamStr)],
                each [i]null,
                each [i=[i]+1, res = FnProcessOnePage([res][Access],[res][Next])],
                each [res][Data])
    in
        GeneratedList

in FnMktoGetPagedData
Save the query. We are going to use it next.
Simplified Query
Let’s rewrite again our query ‘MktoLeads’ which will be calling theFnMktoGetPagedDatafunction.
let

    // Get Url from config worksheet - Table REST_API_Authentication
    mktoUrlStr = Excel.CurrentWorkbook(){[Name="REST_API_Authentication"]}[Content]{0}[URL],
    // Get the List id - Table Scoping
    listIdStr = Number.ToText(Excel.CurrentWorkbook(){[Name="Scoping"]}[Content]{0}[List ID], "D", ""),
    // Get the Lead fields to extract - Table Leads
    LeadFieldsStr = Excel.CurrentWorkbook(){[Name="Leads"]}[Content]{0}[Lead Fields],


    // Build Multiple Leads by List Id URL
    getMultipleLeadsByListIdUrl = mktoUrlStr & "/rest/v1/list/" & listIdStr & "/leads.json?fields=" & LeadFieldsStr,

    // Build Marketo Access Token URL parameter
    accessTokenParamStr = "&access_token=" & FnMktoGetAccessToken(),

    // No initial paging token required for this call
    pagingTokenParamStr = "",

    // Invoke the multiple REST API calls through the FnMktoGetPagedData function
    result = FnMktoGetPagedData (getMultipleLeadsByListIdUrl , accessTokenParamStr, pagingTokenParamStr)

in
    result
As you can see, our query is now really simple to read and to maintain. We are going to leverage again theFnMktoGetPagedDatafunction for the other queries.
Load Specific Activities from a Defined Period of Time
GET ACTIVITIES WITH PAGINATION
Marketo permits a huge variety of activity types related to lead records. Nearly every change, action or flow step is recorded against a lead’s activity log and can be retrieved via the API or leveraged in Smart List and Smart Campaign filters and triggers. Activities are always related back to the lead record via the leadId, corresponding to the Id of the record, and also have a unique integer id of its own. You’ll find the complete REST API documentationhere.
There are a very large number of potential activity types, which may vary from subscription to subscription, and have unique definitions for each. While every activity will have its own unique id, leadId and activityDate, the primaryAttributeValueId and primaryAttributeValue will vary in their meaning.
We are going to focus on the Interesting Moments, one kind of Marketo tracked activities with the ID 46.
The new challenges we are going to resolve are:
We need to initiate a ‘date-based’ paging token to define the period of time when the activities happened,
Shaping the data is a bit trickier as depending on the activity types, a list of activity-specific attributes is provided in Json and need to be parsed and flatted out in order to ease up the analysis.
DATE BASED PAGING TOKEN
We need to build first this function in order to generate the initial ‘date-based’ paging token, required to scope the period of time for our Activity queries. You’ll find the documentation about the paging tokenhere.
Create a new blank query calledFnMktoGetPagingTokenand enter the following code in the advanced editor:
let
    FnMktoGetPagingToken =(accessTokenStr)=>

        let
            // Get url from config worksheet - Table REST_API_Authentication
            mktoUrlStr = Excel.CurrentWorkbook(){[Name="REST_API_Authentication"]}[Content]{0}[URL],

            // Get Paging Token SinceDatetime from config worksheet - Table Scoping
            mktoPTSinceDatetimeStr = DateTime.ToText(Excel.CurrentWorkbook(){[Name="Scoping"]}[Content]{0}[Paging Token SinceDatetime], "yyyy-MM-ddThh:mm:ss"),

            // Building URL for API Call
            getPagingTokenUrl = mktoUrlStr & "/rest/v1/activities/pagingtoken.json?access_token=" & accessTokenStr & "&sinceDatetime=" & mktoPTSinceDatetimeStr,

            // Calling Marketo API Get Paging Token
            content = Web.Contents(getPagingTokenUrl),

            // Recover Json output and watch if access token is expired, in that case, regenerate it
            newAccessTokenStr = if Json.Document(content)[success]=true then accessTokenStr else "?access_token=" & FnMktoGetAccessToken(),
            pagingTokenJson = if Json.Document(content)[success]=true then Json.Document(content) else Json.Document(Web.Contents(mktoUrlStr & "/rest/v1/activities/pagingtoken.json?access_token=" & newAccessTokenStr & "&sinceDatetime=" & mktoPTSinceDatetimeStr)),

            // Parsing Paging Token
            pagingTokenStr = pagingTokenJson[nextPageToken]

        in
            pagingTokenStr

in FnMktoGetPagingToken
Save the function. We are going to use it next.
INTERESTING MOMENTS ACTIVITIES
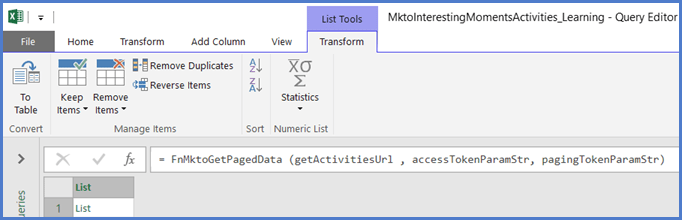
Let’s write now the query ‘MktoInterestingMomentsActivities’ which will be calling theFnMktoGetPagedData andFnMktoGetPagingTokenfunctions.
let

    // Get Url from config worksheet - Table REST_API_Authentication
    mktoUrlStr = Excel.CurrentWorkbook(){[Name="REST_API_Authentication"]}[Content]{0}[URL],
    // Get the List id - Table Scoping
    listIdStr = Number.ToText(Excel.CurrentWorkbook(){[Name="Scoping"]}[Content]{0}[List ID], "D", ""),

    // Build Get Activities URL
    getActivitiesUrl = mktoUrlStr & "/rest/v1/activities.json?ListId=" & listIdStr & "&activityTypeIds=46",

    // Build Marketo Access Token URL parameter
    accessTokenStr = FnMktoGetAccessToken(),
    accessTokenParamStr = "&access_token=" & accessTokenStr,

    // Obtain date-based paging token used to scope in time the activities
    pagingTokenParamStr = "&nextPageToken=" & FnMktoGetPagingToken(accessTokenStr),

    // Invoke the multiple REST API calls through the FnMktoGetPagedData function
    result = FnMktoGetPagedData (getActivitiesUrl , accessTokenParamStr, pagingTokenParamStr)

in
    result
The result of this query is again a list of lists, so it needs some further data processing to be usable for analysis.
Shaping the Data
Let’s do the same shaping operations we did for the Leads:
Right click on the output grid and choose ‘To Table’ in the contextual menu in order to convert it to a table of lists,
Expand the resulting table of lists,
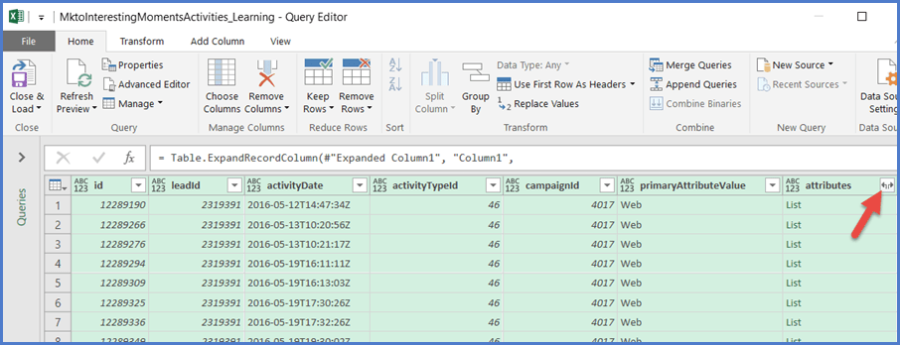
Expand one more time, selecting in the pop up all the fields you want to keep (uncheck the tick box ‘Use original column name as prefix’).
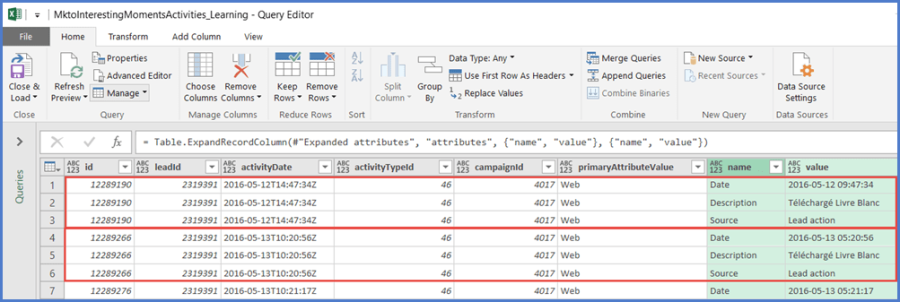
You can see the columns with their values, except the column ‘attributes’ that still contain a list of specific attributes associated to the interesting moments.
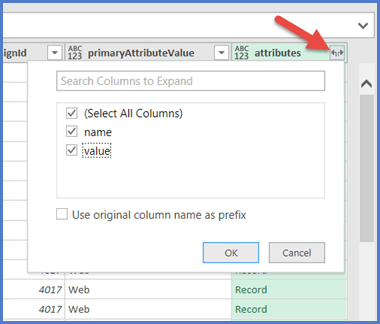
Let’s expand these attributes.
Now the list has expanded into records, we expand again, selecting the fields we want (name and value of each attribute) and we uncheck the tick box ‘use original column name as prefix’.
As a result, all our data are visible, including attributes, but each interesting moment activity is spanned over 3 lines. This is going to be hard to use for our analysis.
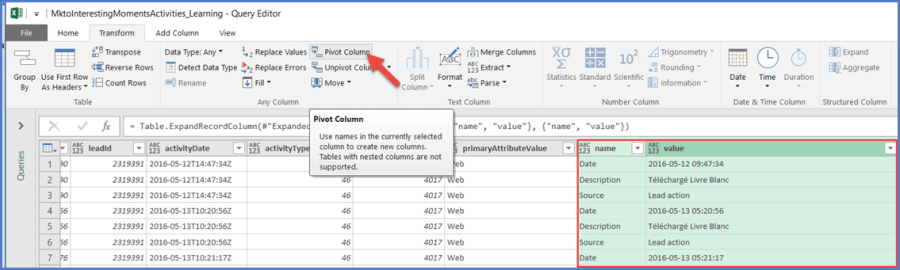
Ideally we want just one line per activity, with all attributes displayed as extra columns. We can easily do that by pivoting the 3 attributes from our table.
Select the 2 columns ‘Name’ and ‘Value’ from the activity attributes and click on ‘Pivot Column’ in the ‘Transform’ menu.
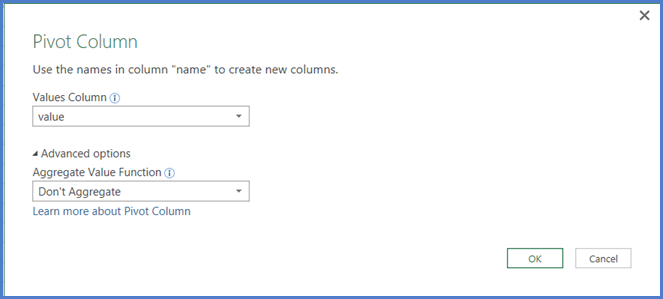
Ask for the advances options in the pop-up and select ‘Values Column’ = value and ‘Don’t aggregate’ value function.
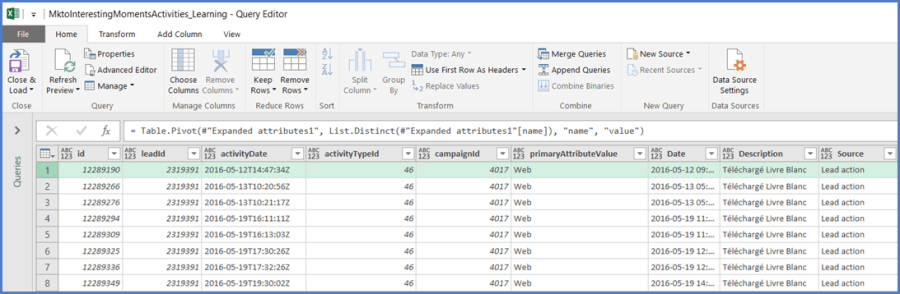
Click ‘OK’ and you have in output one single line of data per activity.
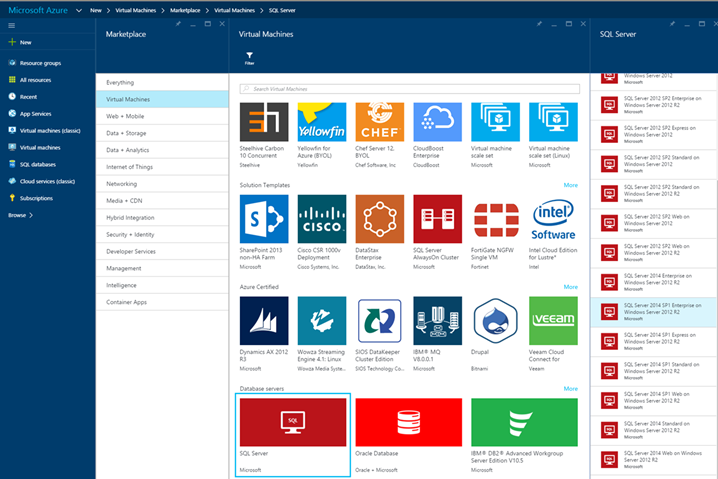
The following ‘data shaping’ lines of code should have been appended automatically to the script of your query:
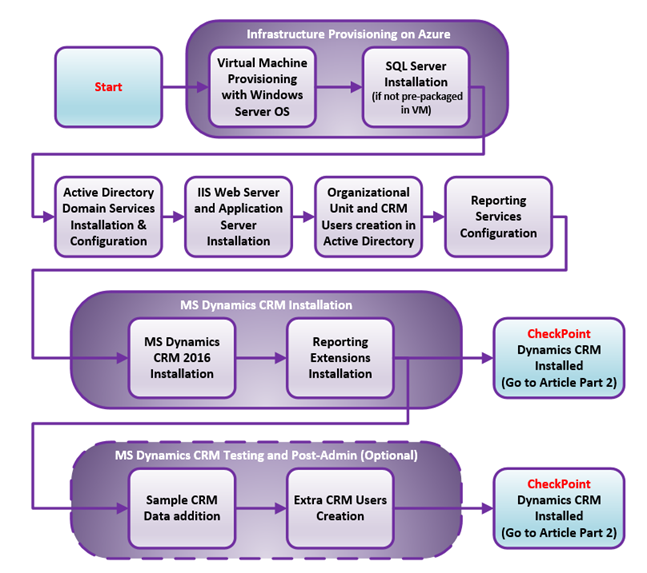
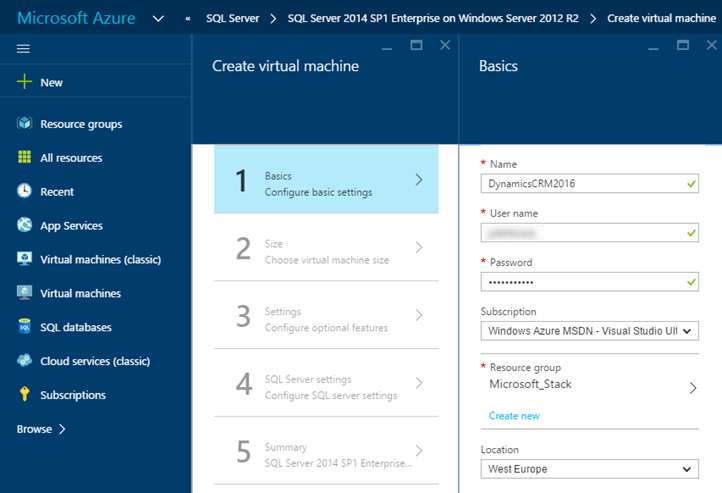
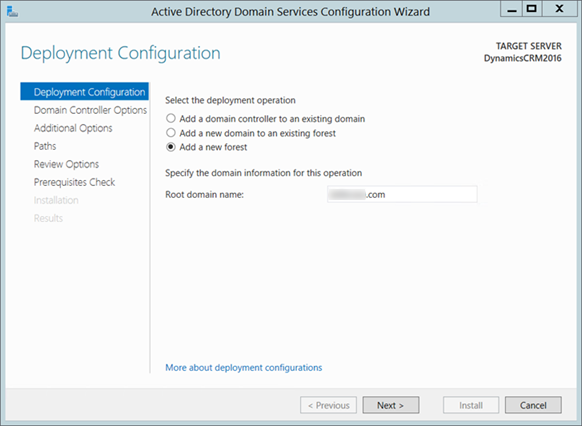
This article in 2 parts, explains step by step how to set up a Microsoft Dynamics CRM 2016 development server on an Azure Virtual Machine and to open it to the Internet via the CRM Internet-Facing Deployment.
These steps are not intended to be followed for a Production server as they rely on a single Virtual Machine for all the infra-structure including:
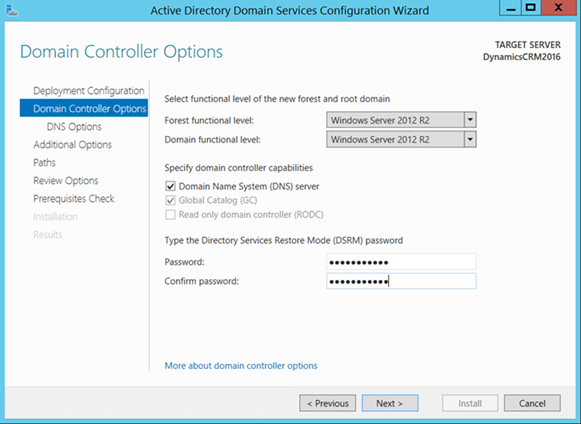
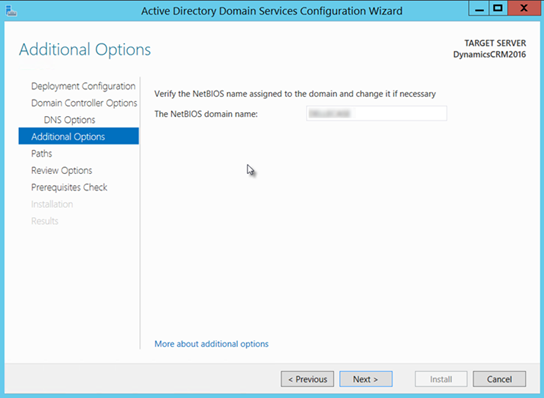
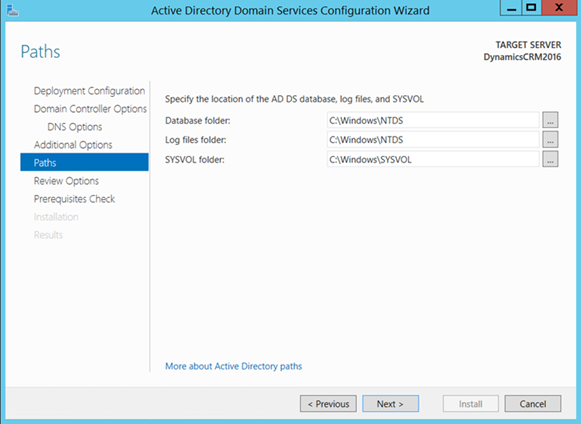
Windows Server 2012 R2 Operating System
Active Directory Domain Services role,
Web Server (IIS) Role
Active Directory Federation Service (ADFS) V3.0 role,
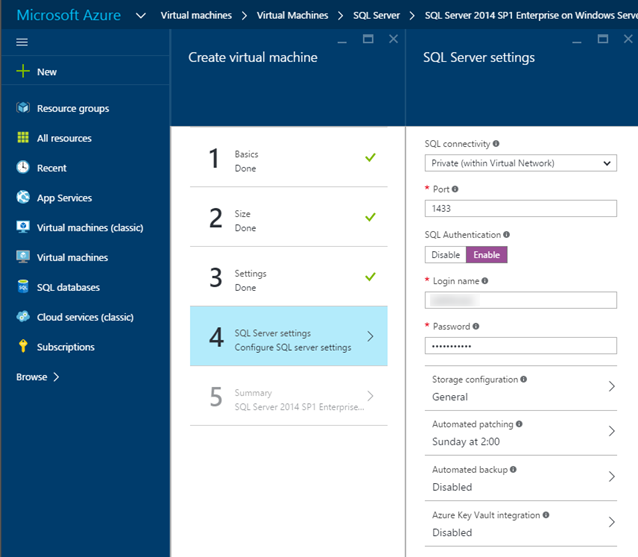
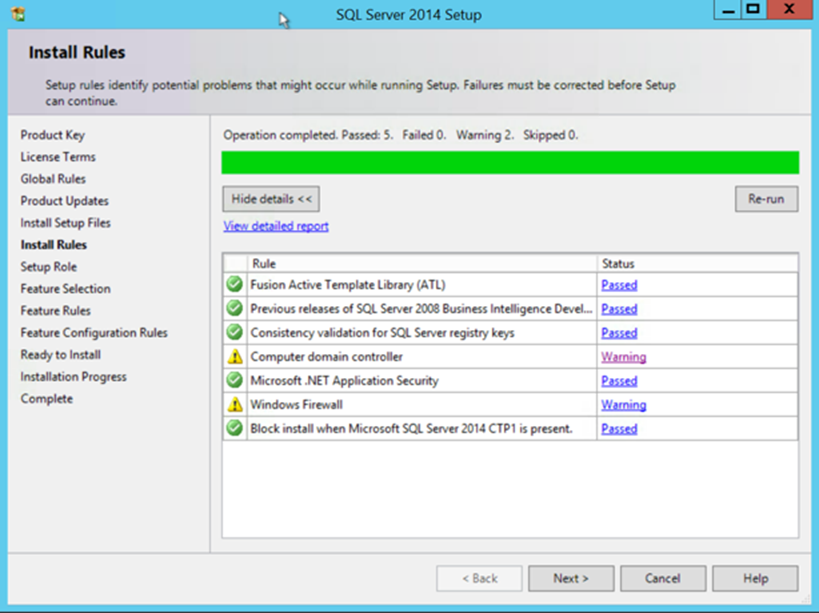
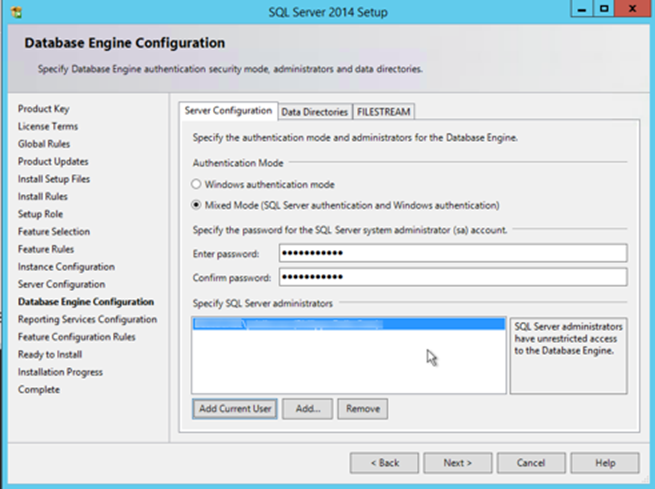
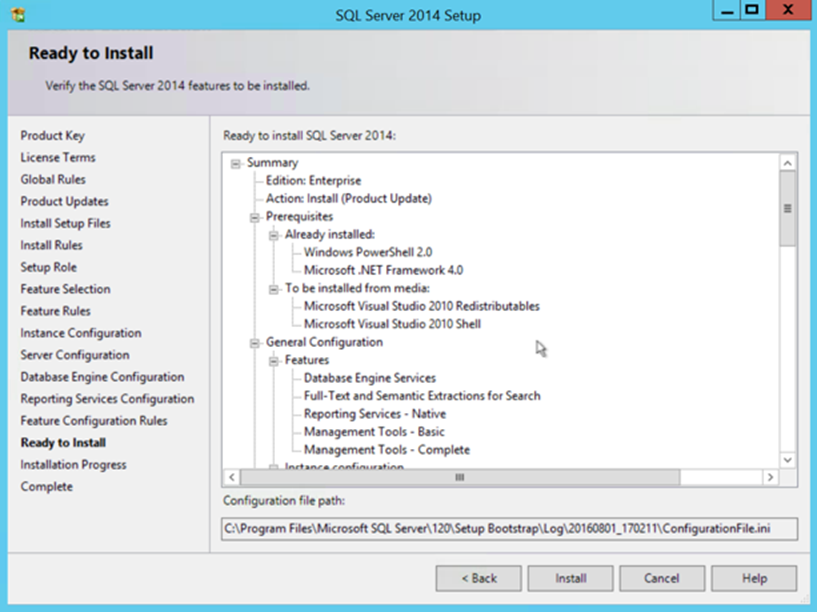
SQL Server Enterprise 2014 SP1,
and of course Dynamics CRM 2016 with all roles on the same server.
This is clearly not a configuration recommended and supported by Microsoft but it’s very didactic as it touches to a good range of Microsoft server technologies and concepts.
This deployment adds a bit of complexity regarding some required work-arounds to make it run properly, but also remove some complexity in overall (less servers to deploy and configure, lower administration). Some straight lines and assumptions are taken, for example regarding the Windows accounts that again is not suitable for a Production environment.
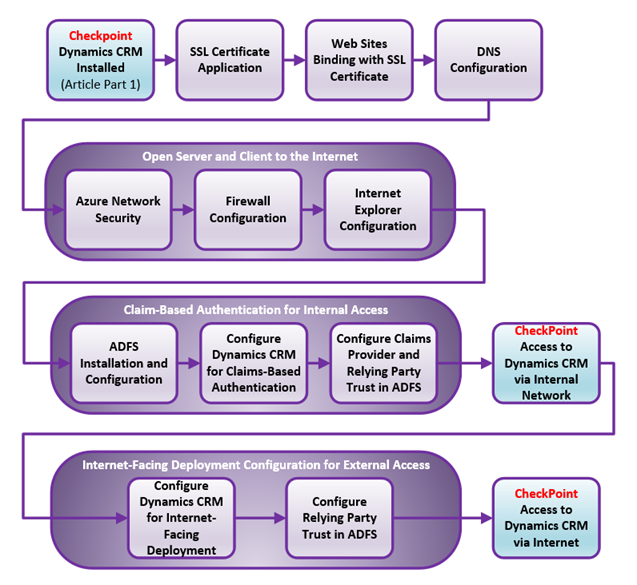
Part1 covers the core infrastructure installation with MS Dynamics CRM 2016 configured for a simple AD Authentication, restricted to internal users. The schema below highlights the process:
You can complete Part 1 of this article and stop there with a fully functional Dynamics CRM 2016 server accessible only from the internal network.
Part 2 covers the Internet-Facing Deployment configuration of Dynamics CRM 2016 to have it support Claim-Based authentication for internal and external access thanks to the MS Active Directory Federation Service. The schema below highlights the process:
Requirements
For this deployment you need:
A SSL wildcard certificate provided by a well know Certificate Authority,
Admin access to a domain provided by an Internet Domain Name Registration Provider or by your company (access to the DNS),
Full Administration access on the infrastructure of your servers,
If you are building a development environment hosted on Azure, then the Part 1 of this article is assumed to be covered.
SSL Certificate Application
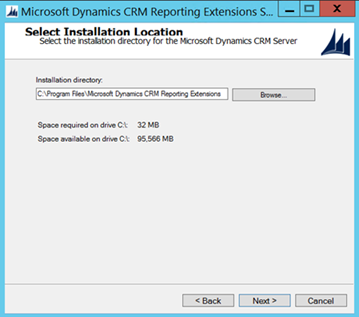
Our development instance of Dynamics CRM will be accessed via the URL https://crm2016.mydomain.com:444 (In this article mydomain.com is a fake domain to be replaced by your domain of choice).
We need to purchase a standard SSL wildcard certificate to be applied to our IIS Server. If you intend to stop this deployment to Dynamics CRM only, then you could eventually consider to use a free self-signed certificate for testing/dev purpose, but be aware that some integrations with other systems, following this article, may not work.
As a SSL Certificate Provider, we’ll use the services of https://www.namecheap.com that is one of the cheaper provider of the market with pretty good tracking records.
On your Windows Server, open IIS Manager:
Click the Server Name of the left panel
On the central panel, double click the ‘Server Certificates’ icon
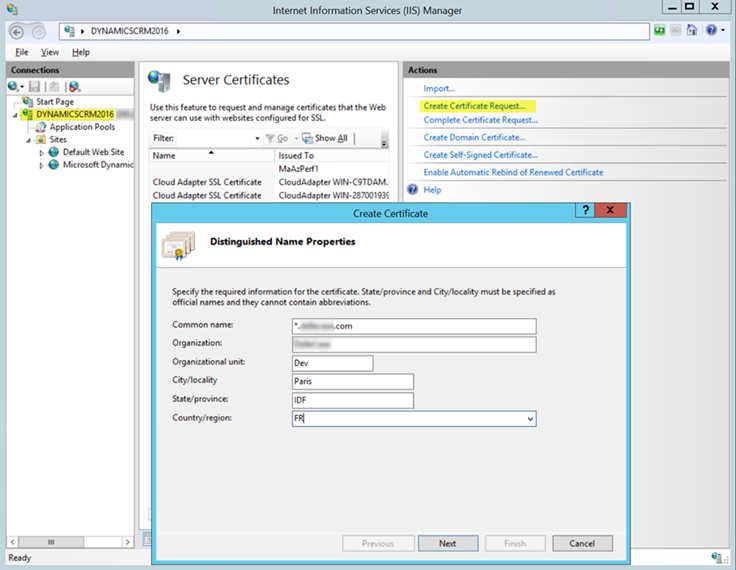
On the right panel, click ‘Create Certificate Request’
Fill-up the ‘Distinguished Name Properties’ pop-up fields with alphanumeric symbols (no special ones such as ‘&’, ‘/’,’@’, etc. allowed):
Common Name – The name through which the certificate will be accessed (example *.mydomain.com for a wildcard certificate)
Organization – The legally registered name of your organization/company
Organizational unit – The name of your department within the organization
City/locality – The city in which your organization is located
State/province – The state in which your organization is located
Country/region – two-digit country code
The next screen ‘Cryptographic Service Provider Properties’ offers to choose 2 parameters. Check with your Certificate Provider in order to be sure what values to fill there. The most common values today are:
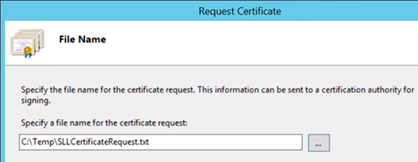
Next select a place where to store the Certificate Request text file, any place and any file will work.
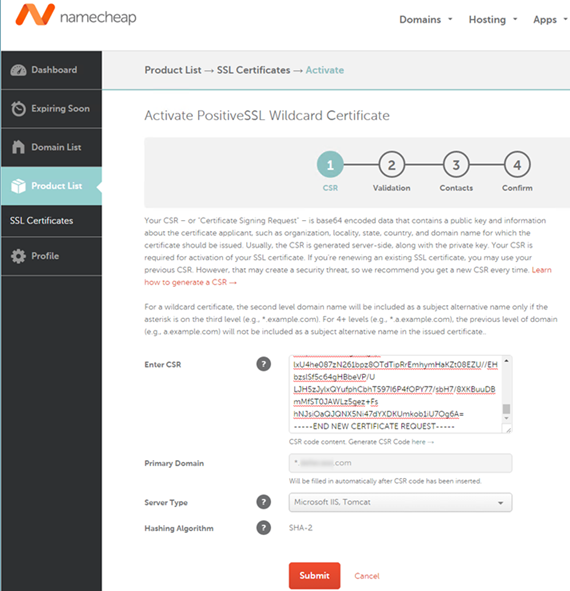
Now on the SSL Certificate Provider web site, activate your newly purchased certificate and paste the content from the previously generated file to the Certificate Signing Request (CSR) field. Select IIS as a web server if this choice is available.
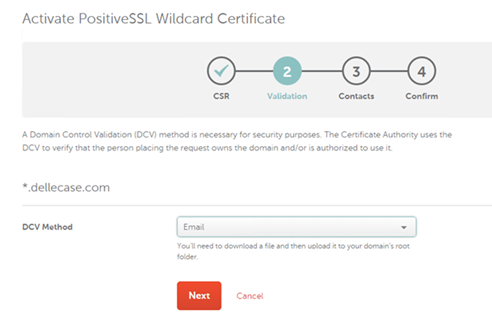
Your SSL Certificate provider will require to go through a Domain Control Validation (DCV) process for security purpose.
We opted for the Email method to complete the DCV (Other possible alternative: HTTP-based validation or DNS-based validation). The validation can take a few hours to a couple of days.
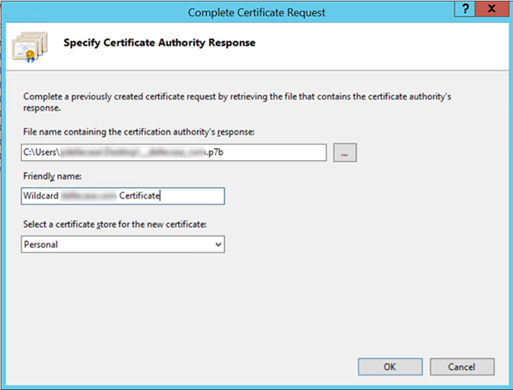
Once the SSL Certificate delivered, download it and select the Action “Complete Certificate Request” in IIS Manager and upload your certificate.
Our SSL Certificate Provider delivered the certificate under different formats, we selected the one with the extension p7b (.cer, .p7s, .p7b should be equally accepted by IIS).
Web Sites Binding with SSL Certificate
Default Site
On your Windows Server, open IIS Manager:
Click the Server Name of the left panel
Expand the Sites and select the Default Web Site
On the right Action panel, click “Bindings”
Click the button “Add” in the Site Bindings” pop-up
Select Type = ‘https’
Leave IP address to ‘All Unassigned’
Set Port = 443
Select your wildcard SSL Certificate by its friendly name
Click OK
Dynamics CRM Site
in IIS Manager:
Click the Server Name of the left panel
Expand the Sites and select the Microsoft Dynamics CRM Web Site
On the right Action panel, click “Bindings”
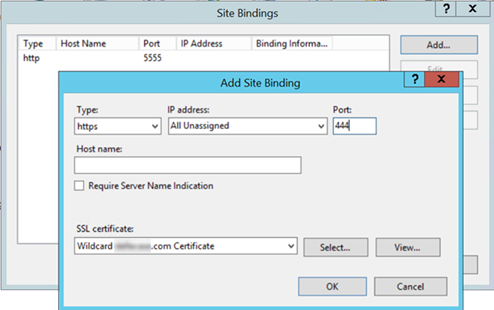
Click the button “Add” in the Site Bindings” pop-up
Select Type = ‘https’
Leave IP address to ‘All Unassigned’
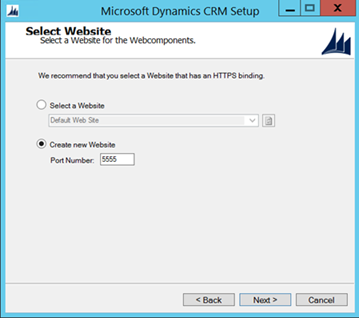
Set Port = 444 (must be different from the port used for the default web site)
Select your wildcard SSL Certificate by its friendly name
Click OK
DNS Configuration
Our DNS requirements are the following:
To set up Claims-based authentication for our Dynamics CRM server:
internalcrm.mydomain.com – URL accessed by internal network users à Internal access
sts.mydomain.com – URL pointing to the security token service (ADFS) à Internal and external access
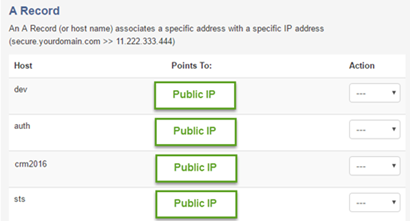
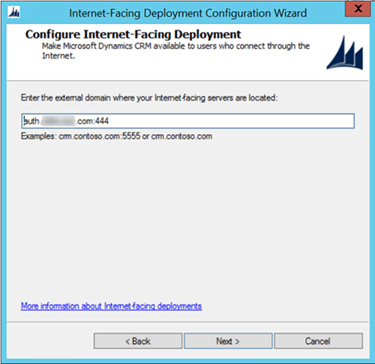
To set up IFD:
crm2016.mydomain.com – URL accessed by external network users à External access
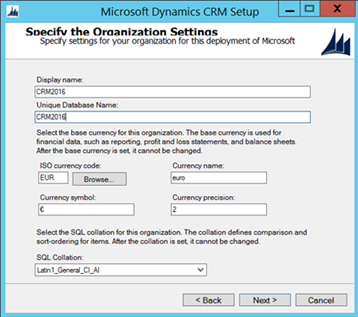
Important: this name has to match the name of your Dynamics CRM Organization
dev.mydomain.com – Discovery service URL à External access
auth.mydomain.com – external IFD URL à External access
We need the services of an Internet Domain Name Registration Provider to create an external domain. Typically, providers such as Namecheap (http://www.namecheap.com) or GoDaddy (http://godaddy.com) can provide this for a reasonable cost.
For External accesses, we create the following A Records pointing to our public IP (See Part 1 of this article to find out how did we get this IP from Azure) From the user interface of the Domain Provider.
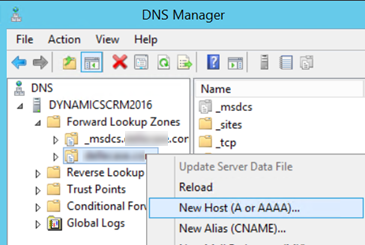
For internal accesses, we can set up A Records via our local DNS Manager…
… or add the following entries within the host.file. This file is located on your loca server: C:\Windows\System32\drivers\etc. This is acceptable for a development server.
(replace holes by your domain and 10.0.0.4 by your private IP adress)
Test all the DNS names, from your server and from the internet.
Notes:
You may not be able to ping those names because Azure may block those request
In case of local name resolution problems, you can try to clean up the DNS cache
Open your Server to the Internet
The following steps are specific to the Dynamics CRM server deployed on an Azure VM (Part 1 of this article). If your server is hosted by a different Cloud platform provider, then you’ll need to refer to their documentation. In any cases, the second step about configuring the Firewall stay valid.
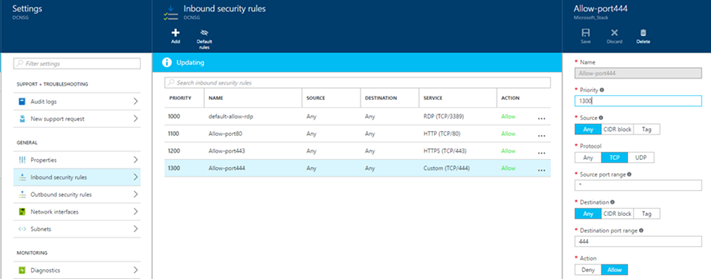
Inbound Security Rules on Azure
Create Inbound Security Rules on your Network Security Group to allow inbound access from the outside world.
On the Azure Portal:
Select your Virtual Machine
Select your current Network Interface associated with your Static IP
Select the Network Security Group
Click on the “Inbound Security Rules”
Create the following rules depending on your need
Open Port 80 (only if access to default web site on HTTP is required)
Source:any / protocol:TCP / Source port range:* / Destination:any / Destination port range: 80 / Action: Allow
Open Port 443 (required for our Dynamics CRM IFD set up where port 443 is bound to the default web site for ADFS)
Source:any / protocol:TCP / Source port range:* / Destination:any / Destination port range: 443 / Action: Allow
Open Port 444 (required for our Dynamics CRM IFD set up where port 444 is bound to the Dynamics CRM web site)
Source:any / protocol:TCP / Source port range:* / Destination:any / Destination port range: 444 / Action: Allow
Firewall configuration
On the Windows Server, launch the “Windows Firewall with Advanced Security” Tool from the Server Manager and create the following Inbound Rules reflecting the rules you have defined via your Azure Network – Security Group:
Open port 443 on TCP
Open port 444 on TCP
Optionally if you want to leave access to your default web site in HTTP, open port 80 on TCP
The firewall could eventually cause problems for the remaining steps of this deployment if not configured properly, we recommend to temporarily turn it off until you can verify the IFD is working properly with Dynamics CRM and then turn it back on again later.
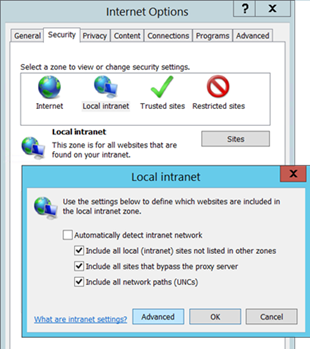
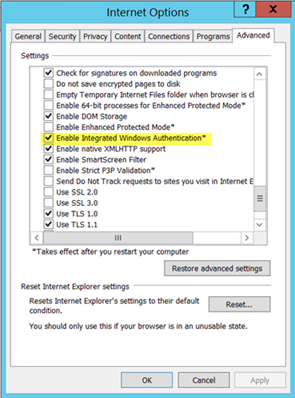
Declare your Domain’s Web sites in Internet Explorer
Include all your web sites in the local intranet zone in order to avoid some security blockages with Internet Explorer later.
Within IE, click on the “Tools” Icon and select “Internet Options”.
Pick the tab “Security”, select “Local Intranet” and click the “Sites” button, and then click the “Advanced” button on the pop-up.
Finally, add all the web sites of your domain, e.g. add the entry “*.mydomain.com”.
Claim-Based Authentication Configuration for Internal Access
Active Directory Federation Services Installation and Configuration
We need to install ADFS 3.0 that will act as the Security Token Service (STS) for our Claim-based authentication. It will be using our default IIS web site.
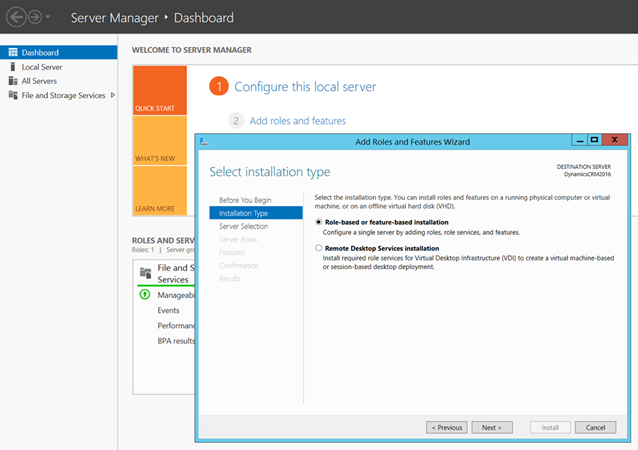
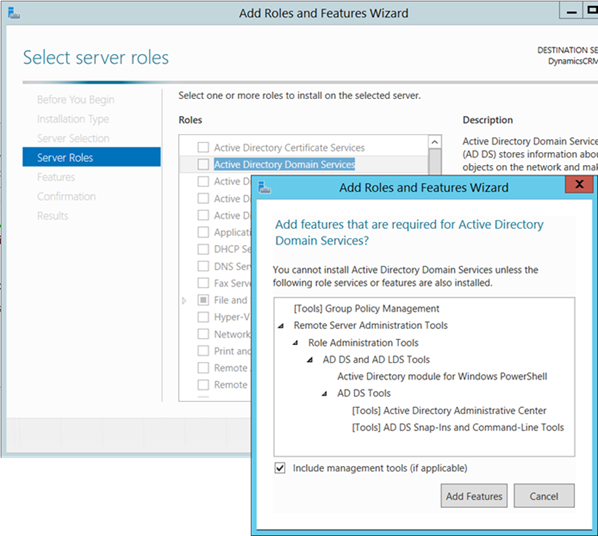
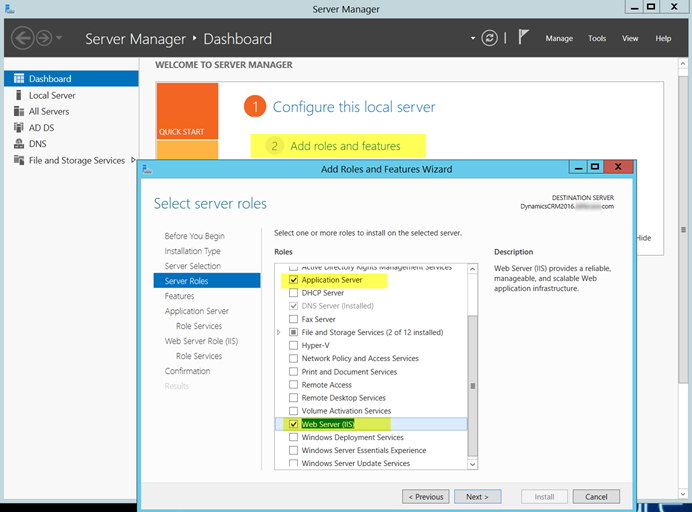
On your Server, open the Server Manager:
Click “Add Roles and Features”
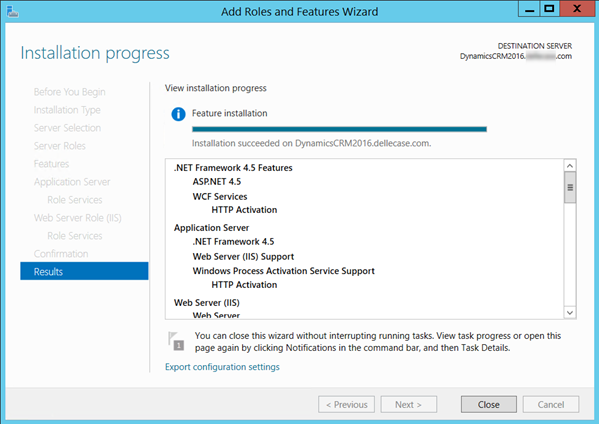
In the wizard, select “Server Roles”
Check the role “Active Directory Federation Services”
In the wizard, select “ADFS” and read the content
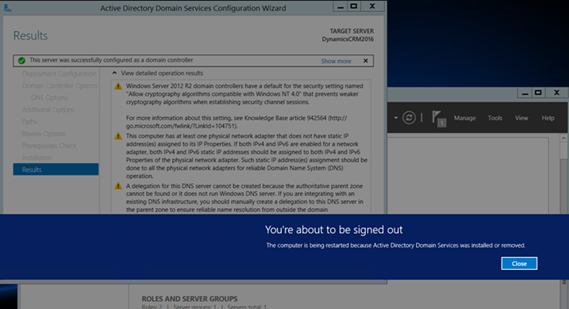
In the wizard, select “Confirmation” and tick the box “Restart the destination server automatically if required”
Click “Install”
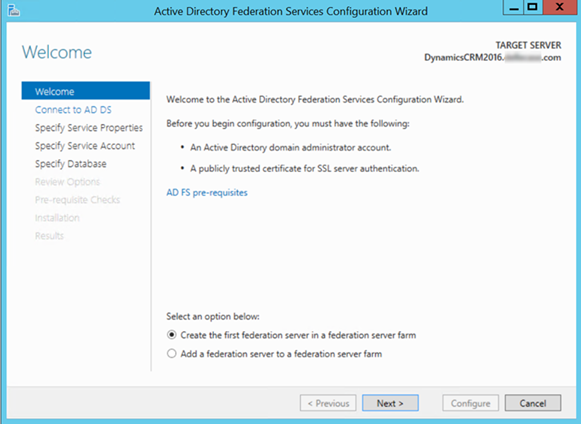
Once the installation is complete, click “Configure the federation service on this server”.
On the Configuration wizard, leave the choice “Create the first federation server farm” and click “Next”.
Next screen, select an account with AD domain admin permissions, your account should be fine in the context of this development installation.
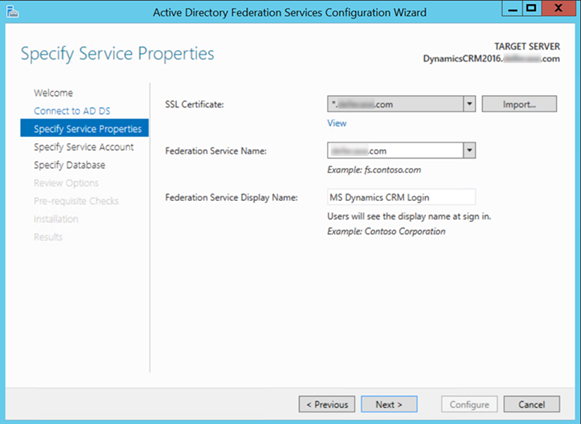
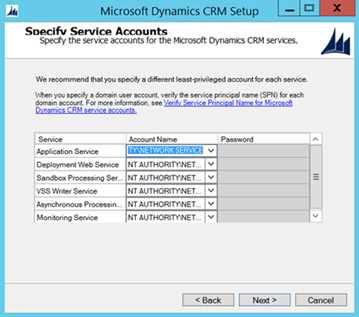
On the “Specify Service Properties” screen:
Select the SSL certificate we created at the beginning of this article (do not click Import)
Set the Federation Service Name (e.g. sts.mydomain.com)
Choose a relevant FS Display Name as the users will see it at sign in (something like “MS Dynamics CRM”
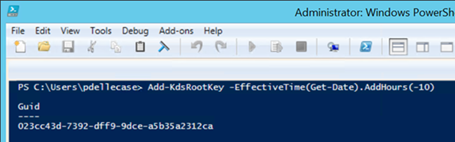
If you click Next, you’ll see the following error:
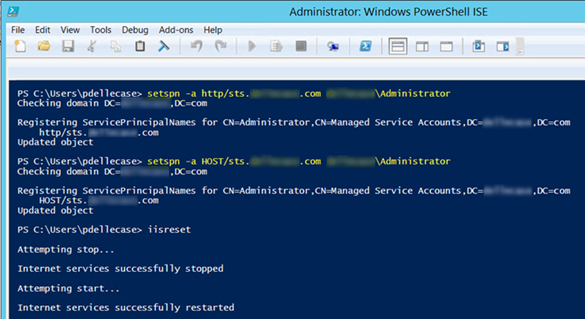
Open Windows PowerShell and execute the following command:
Now you can click “Previous” and then click “Next” on the wizard if you see a Guid provided as an answer.
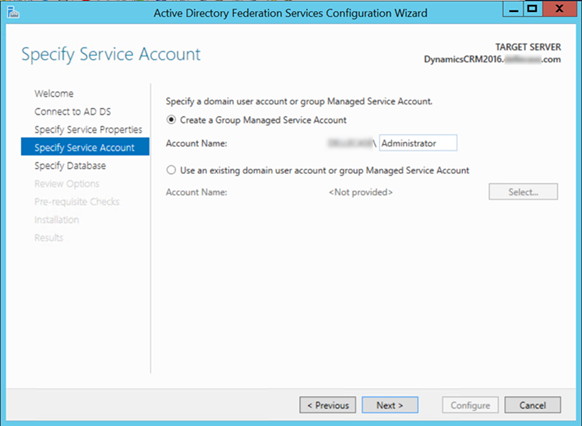
You can go for the creation of a Group Managed Service Account since you are on a development environment. It would be recommended to use a defined account in Production.
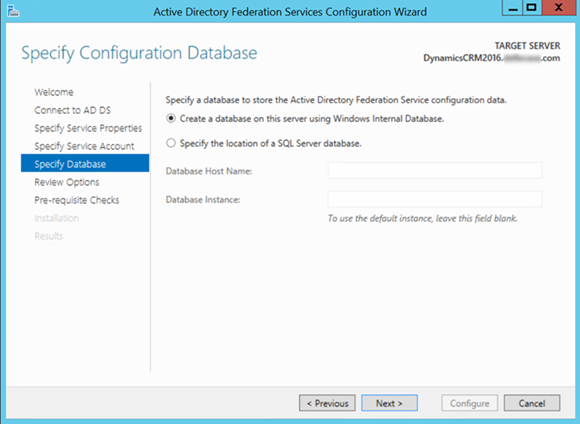
On the next screen we create a database on the server using Windows Internal Database, but you can choose to leverage the existing SQL Server on your Windows Server.
Click “Next” and review your selections and then go to the Pre-requisite Checks.
You can safely ignore the 1st warning, as long as All prerequisite checks passed successfully. Click “Configure”.
Finally, if everything goes well, you should obtain the success confirmation screen.
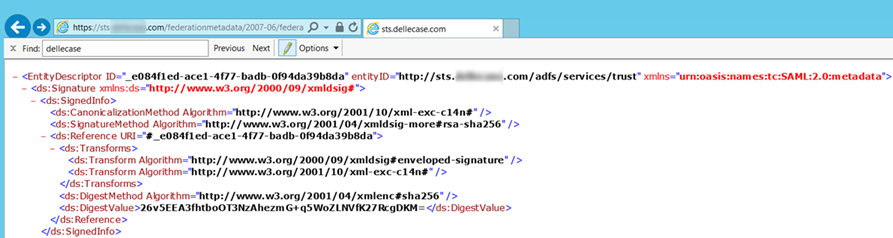
Let’s check the URL of the ADFS metadata in Internet Explorer to verify the ADFS is working properly; you’ll need this URL later.
Replace “sts” eventually by another DNS name of your choice dedicated to ADFS (done in step “DNS Configuration”)
Replace “mydomain.com” by your own domain
If Internet Explorer doesn’t display the XML file, make sure you have done the steps described in section “Declare your Domain’s Web sites in Internet Explorer”
Another important thing to check is that no error appears on the browser regarding your SSL certificate (click on the locker icon close to the URL for more info about it)
Configure MS Dynamics CRM Server for Claims-Based Authentication
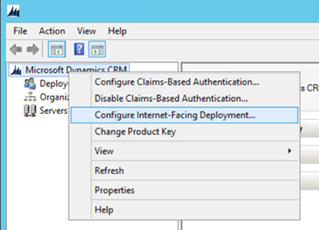
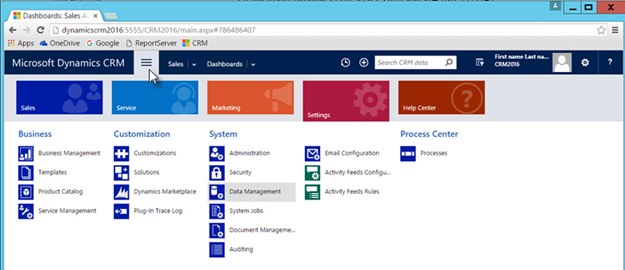
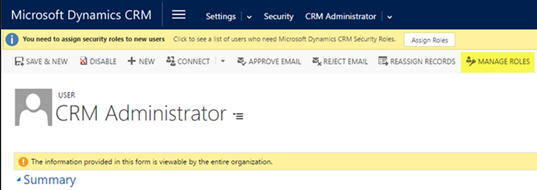
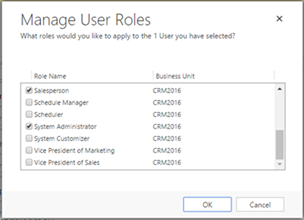
Open the CRM Deployment Manager and follow these steps:
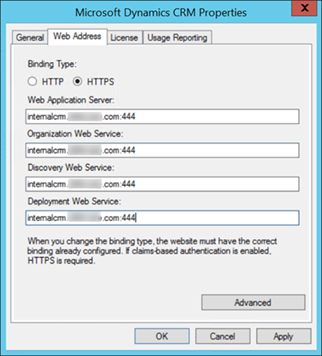
Select “Properties” in the Action menu
Go to the “Web Address” tab
Change Binding Type from HTTP to HTTPS
Replace all occurrence of the server name by the URL accessed by internal network users internalcrm.mydomain.com (see step “DNS Configuration”)
Change all occurrences of the port 5555 to 444
Click the “Apply” button and close the pop-up
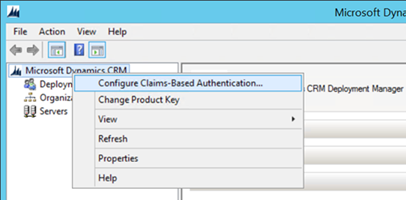
Back to the Microsoft Dynamics CRM Deployment Manager, right click on the top of the tree “Microsoft Dynamics CRM” and select in the menu “Configure Claims-Based Authentication”
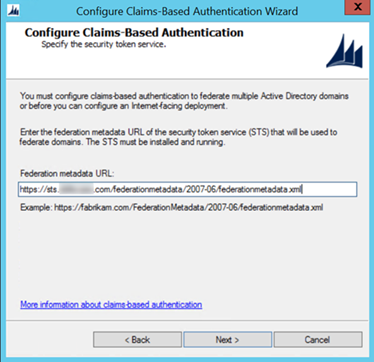
Click Next on the welcome page of the wizard
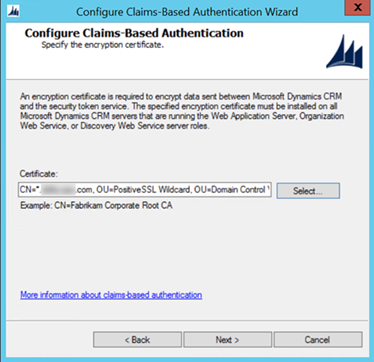
On the “Specify the security token service”, enter the Federation metadata URL we tested in the previous steps, setting up ADFS
Click “Next” and pick your SSL Certificate declared previously with a friendly name
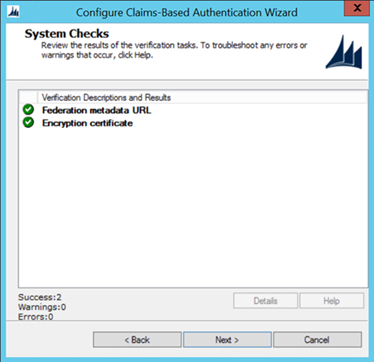
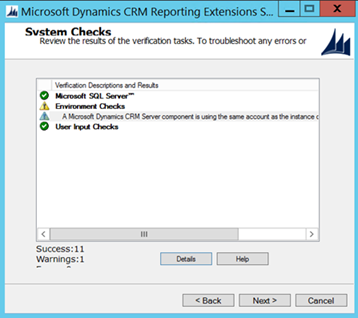
Click “Next” and review the System Checks, you should have 2 successes à this stage
Click “Next” and then click “Apply”
On the last screen, click “View the log file”
Scroll through the log file until the end and take note of the Internal Federation Metadata URL that should look like:
Test that the Internal Federation Metadata URL is working (You may have to do the next step prior to test successfully this URL)
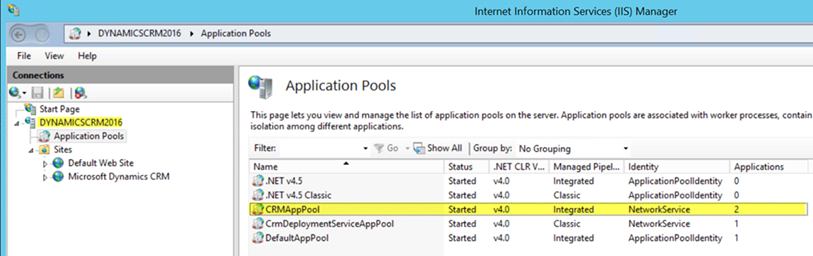
Next we need to grant to the account NETWORK SERVICE the access to the encryption certificate because it’s the account that has been associated by default to the CRMAppPool in IIS. You can double check it on the Application Pools in IIS.
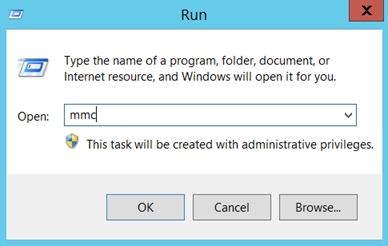
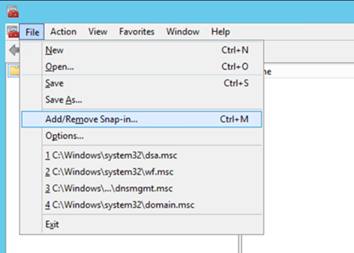
From the Windows Start button, right click and select “Run”
Type the command “mmc” to launch the Microsoft Management Console
Select “Add/Remove Snap-in” from the “File” menu
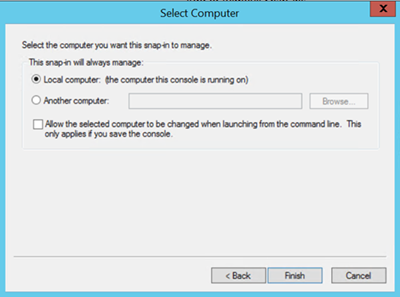
Select the “Certificates” snap-in and click “Add”
Select “Computer Account” and click “Next”
Make sure “Local computer” is selected and click “Finish” and “OK”
Select “Console Root” à “Certificates” à “Personal” à “Certificates”
Right click on your SSL Certificate we declared for the CRM and select “All Tasks” à “Manage Private Keys”
Click the “Add” button
Click the “Advanced” button
Type a search string like “network service” and click “Find Now” button
Pick the account “NETWORK SERVICE” and click “OK”
Ensure the NETWORK SERVICE has got Read access
Apply and close MMC.
Create and configure Claims Provider Trusts and Relying Party Trusts in ADFS
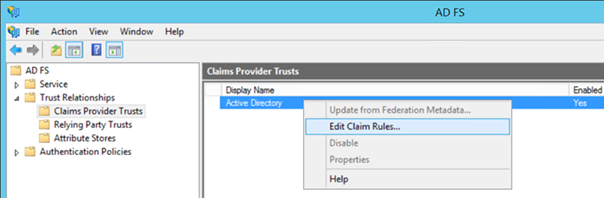
Start AD FS Management from the Server Management’s Tools and follow these steps:
Select “ADFS” à “Trust Relationships” à “Claims Provider Trusts” on the side panel
Right click on “Active Directory” and select “Edit Claim Rules…” on the menu
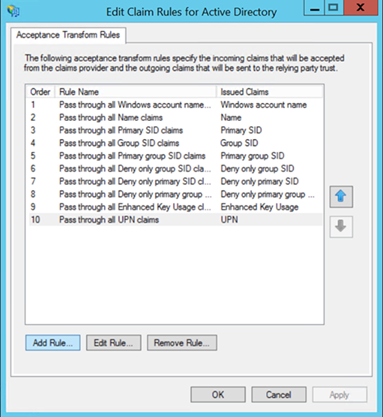
In the Claim Rules editor click the button “Add Rule”
Select “Send LDAP Attributes as Claims” for the Claim rule template and click “Next”
In the Claim Rule configuration screen, create the following rule:
Claim rule name: UPN Claim Rule
Attribute store: Active Directory
LDAP Attribute: User Principal Name
Outgoing Claim Type: UPN
Click “Finish” and “OK” to leave the Claim Rules editor
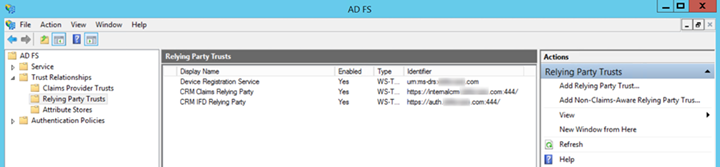
Now it is time to configure the CRM as a relying party to consume claims from ADFS.
Stay in the ADFS Management and follow these steps:
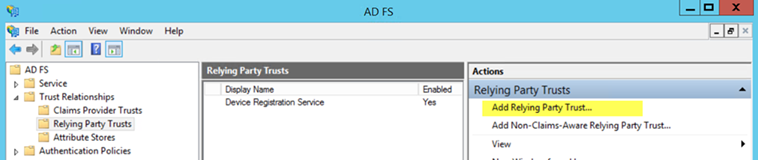
Select “ADFS” à “Trust Relationships” à “Relying Party Trusts” on the side panel
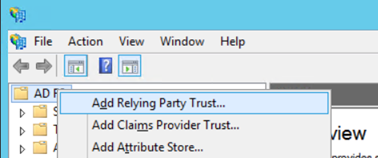
Click “Add Relying Party Trust” in the right Actions panel
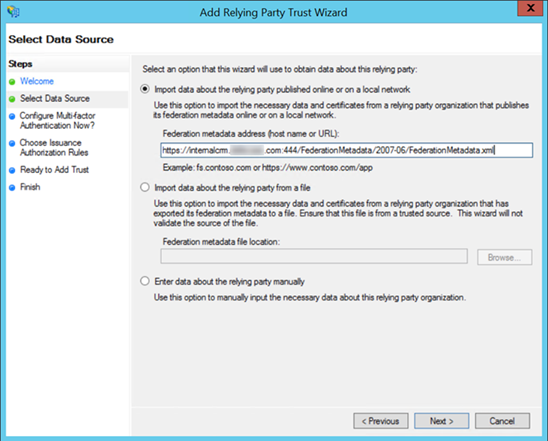
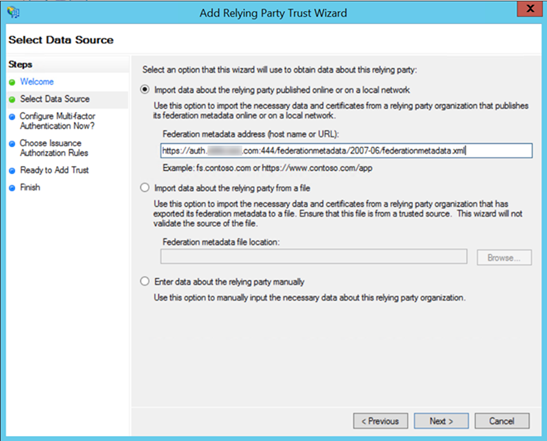
In the “Add Relying Party Trust Wizard”, click the “Start” button
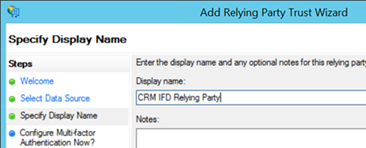
Click “Next” and specify a display name in the following screen like “CRM Claims Relying Party”
Click “Next” and do not configure the “Configure Multi-factor Authentication”, so click “Next” again
On the step “Choose Issuance Authorization Rules”, leave the option “Permit all users to access this relying party” checked
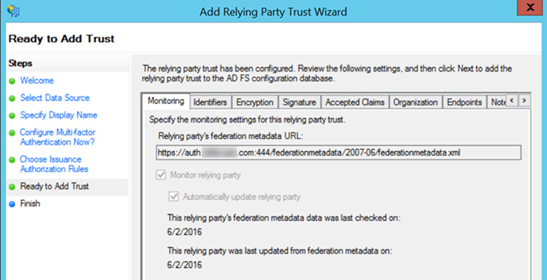
Click “Next” and leave the step “Ready to Add Trust” as it is by clicking again “Next”
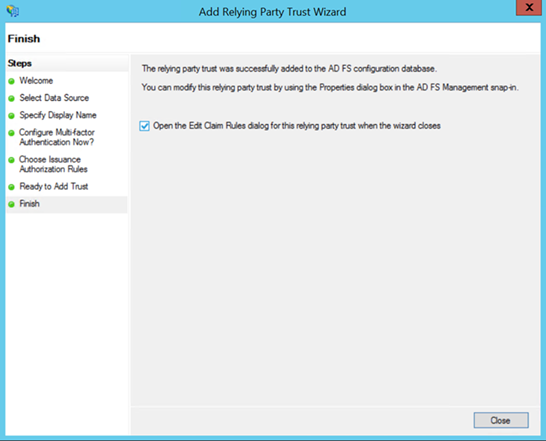
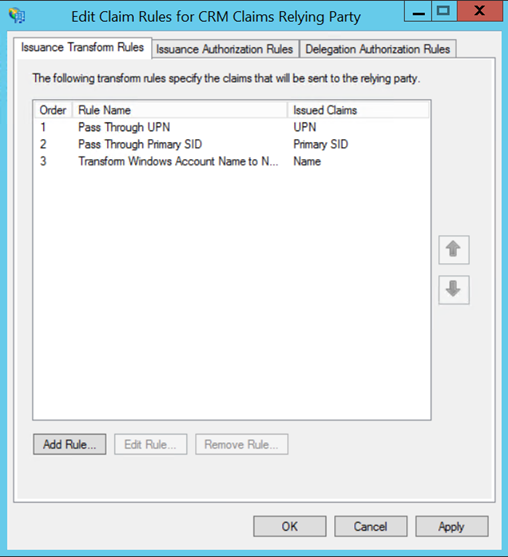
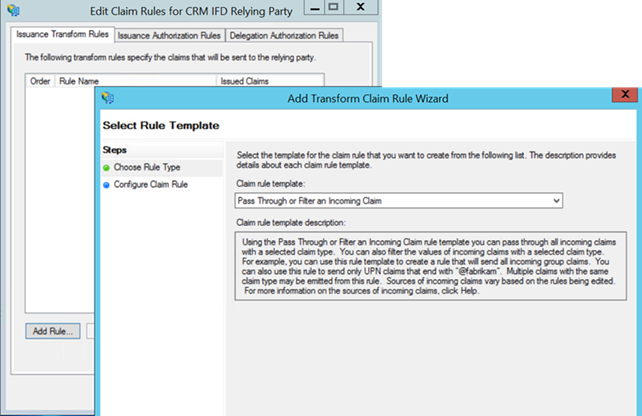
On the “Finish” step, make sure to check the tick box “Open the Edit Claim Rules dialog for this relying party trust when the wizard closes” and push the “Close” button
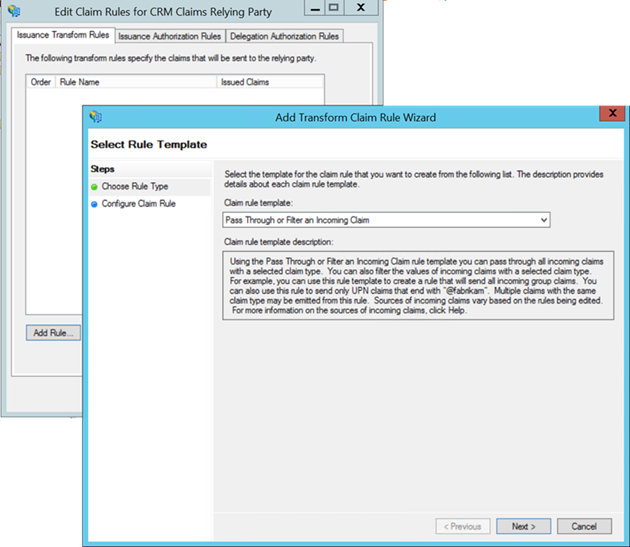
On the Claim Rule Editor, click the button “Add Rule”
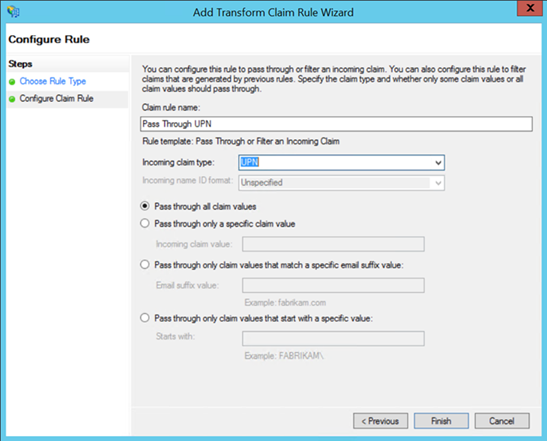
Select the Claim rule template “Pass Through or Filter an Incoming Claim” and click “Next”
Create the Rule n°1:
Claim rule name: Pass Through UPN
Incoming claim type: UPN
Check “Pass through all claim values”
Click “Finish”
On the Claim Rule Editor, click the button “Add Rule” again
Select the Claim rule template “Pass Through or Filter an Incoming Claim” and click “Next”
Create the Rule n°2:
Claim rule name: Pass Through Primary SID
Incoming claim type: Primary SID
Check “Pass through all claim values”
Click “Finish”
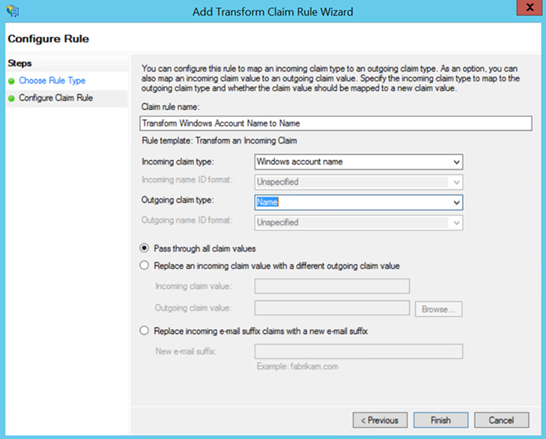
On the Claim Rule Editor, click the button “Add Rule” again
Select the Claim rule template “Transform an Incoming Claim” and click “Next”
Create the Rule n°3:
Claim rule name: Transform Windows Account Name to Name
Incoming claim type: Windows account name
Outgoing claim type: Name
Check “Pass through all claim values”
Click “Finish”
Back to the Claim Rules editor, check you have your 3 rules and click “Apply” and “OK”
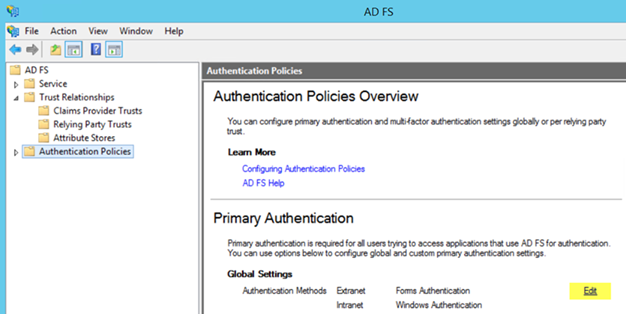
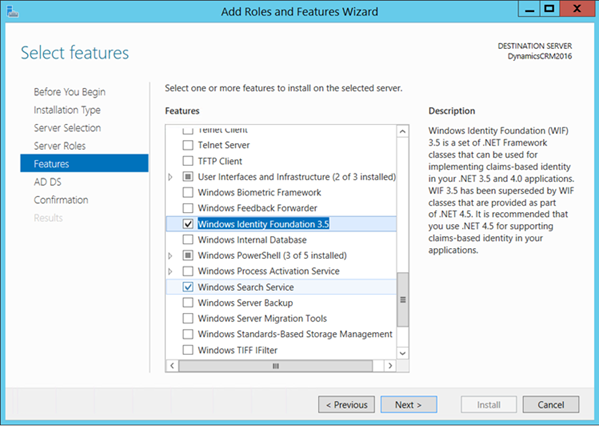
We need now to enable Forms authentication for internal access which is off by default.
Stay in the ADFS Management and follow these steps:
Select “ADFS” à “Authentication Policies” on the side panel
Check the box “Forms Authentication” in the Intranet section.
Apply and close the ADFS Management console.
Open Internet Explorer and open the Internet Options.
Open the tab “Advanced” and make sure the option “Enable Integrated Windows Authentication” is checked.
This should be done for every PC accessing the internal access points so that ADFS and CRM can pass the Kerberos tickets without being prompted for credentials.
Finally, we need to register the ADFS Service Principal Names (SPN) on the user running the ADFS Service:
Open PowerShell or CMD
Enter the following command:
setspn -a HTTP/sts.mydomain.com mydomain\Administrator
setspn -a HOST/sts.mydomain.com mydomain\Administrator
(adjust those parameters with your domain and the user you choose to run the ADFS Service)
Reset IIS with the command
iisreset
Before to move to the IFD configuration, you can test the internal access to Dynamics CRM by typing the URL https://internalcrm.myserver.com:444.
If it doesn’t work at this stage, you need to troubleshoot it before to move on to the next stage. The SPN config. is critical, make sure it’s done correctly.
Internet-Facing Deployment Configuration for External Access
Configure MS Dynamics CRM Server for Internet-Facing Deployment
Open the Dynamics CRM Deployment Manager:
Right Click on “Microsoft Dynamics CRM” and pick “Configure Internet-Facing Deployment” in the contextual menu
Click “Next” on the 1st screen
On the next screen, enter the URLs with the port 444 for
the Web Application server domain (it’s a domain, not a server)
the Organization Web Service domain (identical to web application since we are installing all CRM roles on the same server)
The Discovery Web Service Domain (here we need a resolvable host name, we defined “dev.mydomain.com” for the Discovery Service in the DNS setup phase)
Click “Next”
Leave the default for the Internet Facing Server location (“auth.mydomain.com” has been also defined in the DNS setup phase)
The system checks should come with 2 successes.
Click the “Apply” button on the summary screen and you reach the Finish screen
Create and configure Relying Party Trusts in ADFS for the IFD Endpoint
Start AD FS Management from the Server Management’s Tools and follow these steps:
Right click on “ADFS”
Select “Add Relying Party Trust…” on the contextual menu
This open the “Add Relying Party Trust Wizard”, click “Start”
On the “Select Data Source” page, click the choice “Import data about the relying party published online or on a local network”
Type the Federation Metadata URL to locate the federationmetadata.xml file for IFD (should start with the prefix URL you specified in the IFD setup, https and port 444 and then the suffix is the same as for the Internal Federation Metadata URL: https://auth.mydomain.com:444/federationmetadata/2007-06/federationmetadata.xml
Click “Next” and on the “Specify Display Name” page, set the Display name as “CRM IFD Relying Party” for example
Pass the “Configure Multi-factor Authentication” with a “I do not want to configure …”
On the “Choose Issuance Authorization Rules” page, keep “Permit all users to access this relying party” and click “Next”
Confirm the page “Ready to Add Trust” by clicking “Next”
On the Finish page, leave the tick box “Open the Edit Claim Rules dialog for this relying party trust when the wizard closes” and close the wizard
If you missed the previous step, you can right click on the relying party that you created, and click “Edit Claim Rules”
On the Claim Rules editor popup, click “Add Rule” and select the rule template “Pass Through or Filter an Incoming Claim”
Create the Rule n°1:
Claim rule name: Pass Through UPN
Incoming claim type: UPN
Check “Pass through all claim values”
Click “Finish”
On the Claim Rule Editor, click the button “Add Rule” again
Select the Claim rule template “Pass Through or Filter an Incoming Claim” and click “Next”
Create the Rule n°2:
Claim rule name: Pass Through Primary SID
Incoming claim type: Primary SID
Check “Pass through all claim values”
Click “Finish”
On the Claim Rule Editor, click the button “Add Rule” again
Select the Claim rule template “Transform an Incoming Claim” and click “Next”
Create the Rule n°3:
Claim rule name: Transform Windows Account Name to Name
Incoming claim type: Windows account name
Outgoing claim type: Name
Check “Pass through all claim values”
Click “Finish”
Back to the Claim Rules editor, check you have your 3 rules and click “Apply” and “OK”
You should have 3 Relying Party Trusts in the ADFS Trust Relationships
Change the Port of ADFS with the command line and restart the ADFS Service (adfssrv):
Set-adfsProperties -nettcpport 809
Restart IIS with the command line:
iisreset
For information, you can browse the following URL and get the ADFS Web Service WSDL:
that should lead your browser to this authentication screen:
Login with the following format: domain\username
Congratulation !!! you made it through the IFD for Dynamics CRM 2016.
In case of issue, there are ways to help you troubleshoot it. Your favourite search engine is your best friend. Check out also the links below that helped a lot to complete this installation.
Mobile App (Optional)
Once you got MS Dynamics CRM working with the IFD, you can access it from the Dynamics CRM mobile app.
You can download this app on multiple phones and tablets OS:
This article in 2 parts, explains step by step how to set up a Microsoft Dynamics CRM 2016 development server on an Azure Virtual Machine and to open it to the Internet via the CRM Internet-Facing Deployment.
These steps are not intended to be followed for a Production server as they rely on a single Virtual Machine for all the infra-structure including:
Windows Server 2012 R2 Operating System
Active Directory Domain Services role,
Web Server (IIS) Role
Active Directory Federation Service (ADFS) V3.0 role,
SQL Server Enterprise 2014 SP1,
and of course Dynamics CRM 2016 with all roles on the same server.
This is clearly not a configuration recommended and supported by Microsoft but it’s very didactic as it touches to a good range of Microsoft server technologies and concepts.
This deployment adds a bit of complexity regarding some required work-arounds to make it run properly, but also remove some complexity in overall (less servers to deploy and configure, lower administration). Some straight lines and assumptions are taken, for example regarding the Windows accounts that again is not suitable for a Production environment.
Part1 covers the core infrastructure installation with MS Dynamics CRM 2016 configured for a simple AD Authentication, restricted to internal users. The schema below highlights the process:
You can complete Part 1 of this article and stop there with a fully functional Dynamics CRM 2016 server accessible only from the server itself.
Part 2 covers the Internet-Facing Deployment configuration of Dynamics CRM 2016 to have it support Claim-Based authentication for internal and external access thanks to the MS Active Directory Federation Service. The schema below highlights the process:
A Dynamics CRM 2016 On-premise license key (ideally through a MSDN subscription like Visual Studio Ultimate or you can use a trial key).
Virtual Machine Provisioning on Azure (new Portal)
2 alternative options are presented here:
Option 1 relies on an Azure Virtual Machine provided with both Windows Server 2012 R2 and SQL Server Enterprise 2014 SP1. This option is interesting if you do not have a license of SQL Server but would cost more since it will come with a mandatory storage disk, especially if you go for the premium SSD version
Option 2 relies on an Azure Virtual Machine provided with only Windows Server 2012 R2. You’ll have to install your own SQL Server, but it is possible to make it use the VM disk space instead of an independent storage disk, which is fine for a development box.
Option 1: VM with Windows Server 2012 R2 + SQL Server Enterprise 2014 SP1
You need, first of all, a Resource group on the new Azure Portal:
You can create it by clicking “New” à “Resource group”:
Give it a name, select your Azure subscription and then pick a location that is closest to you
You can now create a new Virtual Machine from the new Azure Portal:
Pick the “Database Servers” group and select the “SQL Server 2014 SP1 Enterprise on Windows Server 2012 R2”
SQL Server Enterprise is recommended (64 bits), SQL Server Compact or Express are not supported for Dynamics CRM (see Requirements in the links provided on the second article, Part 2)
Name your Virtual Machine
Define your admin account that will be used for the rest of this article
Select your Azure subscription
Select your Resource Group
On the next page you need to size your Virtual Machine:
Be careful with your choice, this is going to impact your burn rate and overall cost
We pick the DS2 Standard with 2 Cores, 7 GB of RAM, a disk of 14 GB that seems comfortable for a development environment
On the next page we would recommend the Standard disk type for a development box (the premium one adds a lot to the Azure burn rate)
We take the opportunity to create a Storage account, a Virtual Network with a public IP (static), Network Security Group from this interface
The Availability Set is not required for this dev. Environment
On the next page we define the SQL Server settings:
SQL connectivity: Private
Port: 1433 by default
Optionally Enable SQL Authentication and create a login and password for the SQL authentication (Windows Authentication only is fine)
Once the VM provisioning is complete, select “Connect to open a remote desktop session” and access your VM from your remote PC or Mac with Microsoft Remote Desktop. This software can be installed for free on Windows or iOS.
Use your VM username and password to access your Virtual Machine
By default, the Remote Desktop access port 3389 is enabled on your VM but be aware that this is the only open port to start with
Don’t try to ping your VM with your public IP, Azure doesn’t seem to let it going thru
Option 2: VM with Windows Server 2012 R2 only
Make sure you have a Resource group on the new Azure Portal (see Option 1).
You can now create a new Virtual Machine from the new Azure Portal:
Pick the “Windows Server 2012 R2 Datacenter”
Follow the same steps as Option 1, but you will not encounter the SQL Server settings.
Now we are going to install our own database software.
Transfer across your VM an installer of Microsoft SQL Server 2014 SP1 Enterprise (or another MS SQL Server version supported by Dynamics CRM 2016) and launch the installer.
Select ‘New SQL Server stand-alone installation’
Accept the software license terms on the next screen
On the Install Rules screen, you can ignore the warnings about the Computer Domain Controller and Windows Firewall, since we are building a development environment
On the Setup Roles screen, select ‘SQL Server Feature Installation’ and click ‘Next’
On the Feature Selection screen make sure to check the following features:
Database Engine Services
Full-Text and Semantic Extractions for Search
Reporting Services – Native
Management Tools – Basic
Management Tools – Complete
Leave the default installation paths proposed by the wizard
On the next screen, you maybe signaled some missing features like the .NET Framework 3.5 Feature. You’ll need to go and add those features via the Server Manager (Manage à Add Roles and Features). You can proceed with the installer afterward if no reboot is required.
If no missing features, you’ll reach the Instance Configuration screen
Leave the Default instance with its default Instance ID
On the Server Configuration screen, associate the following Account Names:
SQL Server Agent: NT AUTHORITY\SYSTEM
SQL Server Database Engine: NT AUTHORITY\SYSTEM
Leave the other accounts as default
On the Database Engine Configuration, you can keep the Windows authentication mode or optionally use the mixed mode
In that second case, provide a password for the ‘sa’ account
Click the button ‘Add Current User’ to add your current admin account as the SQL Server administrator. You can also add later other users such as your CRM Admin user.
On the next screen, confirm ‘Install and Configure’
And finally, you’ll be ready to install … click ‘Install’
Check the Windows services, and make sure the SQL Server Agent is running. If not, you’ll have to change the Log On user in the service properties and use an admin user declared in the Active Directory (like your current user).
Active Directory Domain Services Installation and Configuration
Access your VM via Microsoft Remote Desktop, open the Server Manager:
Click “Add Roles and Features”
Leave the choice “Role-based or feature-based installation”
Select your server from the server pool
Add the Server Role “Active Directory Domain Services”
Accept to add all the required features for Active Directory Domain Services
Make sure to also include these features:
Windows Identity Foundation 3.5
Windows Search Service
Click “Next” button
Click “Next” button and accept the Wizard to automatically restart the server if needed
Click “Install” and wait the end of the process
Click “Promote this server to a domain controller”
Check “Add a new forest”
Define your Root domain name: e.g. mydomain.com
It will be matching the domain we will register with a public internet Domain provider later, so select it carefully and check if this domain is available
Click “Next”
On the next page, fill up the following fields:
Forest functional level: Windows Server 2012 R2
Domain functional level: Windows Server 2012 R2
Check the box “Domain Name System (DNS) server”
Choose a password for the Directory Services Restore Mode (DSRM) and note it somewhere safe
Click “Next” to reach the DNS Options
Ignore the popup message notifying you that “a delegation for this DNS server cannot be created…” as this is irrelevant for a developer server
Click “Next” and verify the NetBIOS domain name assigned to the domain
Click “Next”
Accept all the default locations for the AD DS database, log files and SYSVOL
Click “Next” and make sure the Prerequisites Check is passed
You can safely ignore the warnings from the Prerequisites Check
Click “Install”
The server reboots at the end of the promotion operation, this is fine, you’ll be able to connect again in a few minutes
You’ll use your domain credentials instead of your local server account, e.g. mydomain\login
IIS Web Server and Application Server Installation
Open again the Server Manager:
Add more server roles:
Application Server
Web Server (IIS)
Click “Next”
Leave the selected features
Click “Next”
On the “Role Services” page for the Application Server, check the following services and add all related features:
.Net framework 4.5
Web Server (IIS) Support
HTTP Activation
Click “Next”
Select the following Management Tools on the “Role Services” for the Web Server (IIS):
IIS Management Console
IIS Management Scripts and Tools
Management Service
Click “Next” and “Install’ then wait the installation process to complete
All the new server roles will now appear in the Server Manager
Organizational Unit and CRM Users creation in Active Directory
Now we are going to add in the domain an Organizational Unit and some users for the CRM:
From the Server Manager, click the “Tools” menu and select “Active Directory Administrative Center”
Create some CRM users, e.g.
CRM Administrator: mydomain\crmadmin
Better check Account never expired for dev users
Add the administrator account into the performance Log Users (it is required if you use this account for the Dynamics CRM set up)
Don’t forget to add a password for your users
Click “OK” for each user
Next, create a new “Organizational Unit”
On the Organizational Unit page:
Name=CRM2016
The CRM setup will add its specific AD security groups in this OU
Click “OK” and leave the wizard
Reporting Services Configuration
Reporting Services are already installed on the VM with SQL Server Enterprise 2014 SP1. We just need to perform a few configuration steps:
Open the Reporting Services Configuration Manager and connect it to your server
Select Report Server Service Account as “Use built-in account” and pick “Local System”
Note that the Report Server local account is not supported by Dynamics CRM
à If you went for the option 2 and installed SQL Server yourself, then you can ignore the following steps about the Reporting Services.
Click “Apply” and move on to the “Web Service URL” page
Just click the “Apply” button to create the IIS directory with default settings on the default web site
Click “Apply” and move on the “Database” page
Click the “Change Database” button
On the popup wizard, select “Create a new report server database” and click “Next”
We are done with the SQL Server Reporting Services (SSRS) configuration
Microsoft Dynamics CRM 2016 Installation
Now it’s time to install Microsoft Dynamics CRM 2016 Server. Launch the Setup:
Click the link “Install Microsoft Dynamics CRM Server”
Get the updates for Dynamics CRM if any
Click “Next”
Install all the listed required components
Click “Next” if all components were installed successfully
Choose a path for the installation files, the default is fine
Click “Next”
Specify the Server Roles
We are building a development environment where all Server Roles are deployed on the same server, so check all tick boxes
In Production, we would probably dispatch the different roles on multiple servers with some redundancy servers in play
Click “Next”
On the Deployment Options, select “Create a new deployment”
Select the name of the computer that is running SQL Server, the same as the one where you’re installing Dynamics CRM
Click “Next”
Browse and select the Active Directory Organizational Unit (OU) created earlier
Click “Next”
On the Service Accounts specification page, we should normally define one specific account per service, but that would be for a Production environment
In our case, we’ll keep the default “Network Service” for all services
You could use a specific account like the “CRM Admin” you created earlier, but we decided to leave this account to be effectively the CRM Administrator later
Click “Next”
On the Website page, it is very important in our case to create a new website dedicated to Dynamics CRM
The default Web site is reserved for ADFS and in our typical scenario is not recommended to use (even if our version of ADFS doesn’t really rely on IIS, there are still some binding magic going on)
Create a new Website with Port Number = 5555
Click “Next”
We do not plan to deploy the Email Router now (this can be done later)
Leave the box blank and click “Next”
On the Organization Settings screen, fill up:
Display Name: CRM2016 (same as Organizational Unit)
Unique Database Name: CRM2016 (same as Organizational Unit)
Select your currency
Leave SQL Collation by default
The selected Organization Name “CRM2016” will be reused in the subdomain of the external URL so choose it carefully
It is possible to add other Dynamics CRM Organizations in top of this one later
Click “Next”
Check that the default Report Server URL is correct (see in Reporting Services configuration)
Click “Next”
This is time for a full system checks
Don’t worry too much about the security warning, there are normal because we are deploying a development environment
Click “Next”
You should reach out the final screen when the Dynamics CRM Server installation is completed
Tick the box “Launch Reporting Extensions for SSRS Setup” so the next wizard can start
Click “Finish”
IIS should now have the Microsoft Dynamics CRM web site in top of the Default Web Site, you can do this quick check
Reporting Extensions Installation
In order to start the CRM Reporting Extensions setup wizard, you could have ticked the dedicated box on the previous wizard or launch it manually from the Dynamics CRM setup:
Check “Get updates for MS Dynamics CRM”
Click “Next”
Select the Database Server, in our case it is deployed on the same server
Click “Next”
Select the SSRS Instance name by default
Click “Next”
Leave the default Installation directory
Click “Next”
Time for the system checks
Again, in the case of our Development server, we are not too worried about the security warnings
Click “Next” and start the installation
This is the completion screen you see when the installation is done successfully
Dynamics CRM 2016 Testing and Post Admin
Accessing Dynamics CRM 2016 for the first time
You can access to Dynamics CRM 2016 with the url: http://{your_server_name}:5555
Do a quick test drive and make sure everything works all right
Sample CRM Data Addition (Optional)
For a Development environment, it’s always a good idea to add some test data. Good news, Dynamics CRM has got a few in store for you:
Pick the “Settings” in the main menu
Click on “System”à“Data Management”
On the next page, select the icon “Sample Data”
Go and install the Sample Data
Extra CRM Users Creation (Optional)
Click on the main menu “Settings” and pick “Security”
Click on “Users” and click the button “+ New”
Enter a user name of someone that is already in your Active Directory
E.g our CRM Administrator created earlier with user name = crmadmin
Data will be autocompleted from AD
Click “Save”
Once the user is saved, click button “Manage Roles”
Typically for our CRM Administrator we select the roles:
This article, also published on the Marketo Developer Blog, explains in details how to integrate Marketo with potentially over 500 Cloud Apps, thanks to Zapier.
For that, we’re going to build from scratch a Zapier connector for Marketo and implement two practical integration use cases:
Use case 1: a unidirectional Leads integration from FullContact Card Reader to Marketo
Scan any contact’s business card with the FullContact mobile Card Reader app and get a lead automatically created in Marketo.
Use case 2: a bidirectional Leads integration between Marketo and Google Sheets
Add an existing lead to a static list in Marketo and find the lead automatically added to your Google Sheet.
Modify any lead in your Google Sheet and find the change echoed back to Marketo.
Requirements prior to get started
Sign-up for a free account with Zapier
Zapier is a Webapp Automation Service that let you easily automate tasks between other online apps without the need for programmers or any IT resources. Check their web site for more info:
Sign up for a free account here: https://zapier.com/sign-up/, you’ll get access to up to 100 tasks/month, 5 zaps, zaps running every 15 minutes. You can of course get much more by subscribing to Zapier’s paid plans (basic, business, business plus, etc…).
Access to a Marketo Instance as Administrator or with a provided API User account
Our Zapier connector will use the Marketo REST API in order to push Leads data to Marketo. In order to use this API, you’ll need an API User and a Custom Service that you can create yourself if you are administrator of your Marketo instance. If not, then an administrator will need to provide those to you. There is also a Webhook to create, only accessible to a Marketo Administrator.
Once you’re done, you should have the following credentials in order to invoke the Marketo REST API:
Client Id,
Client Secret,
No need to get a Token as it would be only valid for a single hour; The Connector will generate tokens for you automatically.
Another information you need from your Marketo instance is the Munchkin Account Id. You can get it from the Munchkin or the Web Services Admin screens. Its pattern looks like this: 000-XXX-000.
Sign-up for a free account with Google
Google Docs, Sheets, and Slides are productivity apps that let you create different kinds of online documents, work on them in real time with other people, and store them in your Google Drive online. Our use case needs a Google Sheet.
The following link covers the different features of Google Docs and leads to the creation of an account with Google: https://www.google.com/docs/about/.
Sign-up for a free account with FullContact
FullContact keeps you fully connected to the people who matter most by pulling in all your contacts and continuously syncing them with changes to social profiles, photos, email signatures, company information, and more. They offer a mobile business cards reader that can scan cards into 250+ Web Apps, including Zapier.
You can sign-up for a free account here: https://app.fullcontact.com/login or eventually subscribe to a premium paid account with more features and capacity.
Implementation of the Marketo Connector for Zapier
Create the Marketo App
From the Zapier web interface, go to the Developers Portal.
Click the button and fill out at minima the Title (e.g ‘Marketo’) and the Description. The logo is optional, but nice to have.
Authentication
In this section we declare the different fields used for the Marketo REST API authentication and the authentication settings.
Create first the following fields:
Label
Munchkin Account Id
Client Id
Client Secret
Key
munchkin_account_id
client_id
client_secret
Type
Unicode
Unicode
Unicode
Required
Checked
Checked
Checked
Edit the ‘Authentication Settings’ as in the following screen:
Auth Type: Session Auth
Auth Mapping:
{
“access_token”:”{{access_token}}”
}
Access Token Placement: Token in Querystring
Zapier proposes a few Authentication Types but typically OAuth V2 would not work with Marketo. Currently the Marketo platform does not offer an Oauth2 authentication similar to Facebook where an end user is forwarded to an authentication page. A Marketo custom service has been created giving access to a client id and client secret. We use the client id and client secret to generate an access token via the REST API authentication endpoint. We can then use this access token to make subsequent requests to the REST API. The token expires after an hour and must be generated again to proceed calling the REST API.
We chose authentication Type = ‘Session Auth’ as it allows us to execute a custom authentication script every time our session token is expired. We’ll see in the section ‘Scripting API’ how to implement this mechanism that can only work with this type of authentication.
Triggers
Zapier Triggers are there to bring data into Zapier. We do not need one for our use cases as we will leverage a Marketo Webhook instead. However, we still need to write a dummy Trigger as a mandatory test for our Marketo connector.
Click now the button and set our Test Trigger to be the one we’ll use to verify a user’s auth credentials.
Actions
Zapier Actions are there to send data out from Zapier.
We are going to implement the Create_Update Lead Action calling the Marketo REST API ‘Create/Update Leads’: http://developers.marketo.com/documentation/rest/createupdate-leads/. This Action will allow to create a new lead within Marketo, or if the lead already exists, it will update it with the submitted values. We’ll use the field ’email’ for deduplication.
Click the button to start the wizard and fill-up the following fields (fields not mentioned can be left blank):
Name and Description
Name: Create_Update Lead
Noun: Lead
Key: create-update-lead
Description: Create a new lead within Marketo, or if the lead already exists update it with the submitted values
Important? Checked
Hide? Not Checked
Action Fields
Action Fields are the fields users will map data into. Choose them carefully according to your own needs as they will represent all the data you will be able to update in Marketo. There is an option in Zapier to offer to the end user all fields available in Marketo, but that would induce more code and complexity, not required for a disposable connector.
As an example, we selected the following fields:
Label
Key
Type
Required?
Parent key
Send in POST by default?
Email Address
email
Unicode
Checked
input
Partition Name
partitionName
Unicode
Not Checked
Checked
First Name
firstName
Unicode
Not Checked
input
Last Name
lastName
Unicode
Not Checked
input
Phone Number
phone
Unicode
Not Checked
input
Notes
Lead_Notes__c
Textarea
Not Checked
input
Called
called
Unicode
Not Checked
input
Partition Name is mandatory in our case since our Marketo instance has Lead Partitions in service. It could be omitted otherwise. We separated it from the ‘input’ group so the end-user understand this is not a field to synch.
The field ‘Notes’ comes from a synch between Marketo and Salesforce, do not use it if you don’t have it in your Marketo instance.
The filed ‘Called’ has been created in our Marketo instance, do not use it if you don’t have it in your Marketo instance.
Of course, the goal is to let you pick the fields you need from Marketo. It is recommended to start small and add the extra fields later.
Zapier’s scripting feature allows to manipulate the requests and responses that are exchanged between your app’s API and Zapier. You can modify HTTP requests just before they are sent and can parse responses before Zapier does anything with them. We need it in order to complete our custom ‘Session Auth’ authentication so it works with Marketo.
It is called every time any ‘post_poll’ methods are encountering an ‘Access Token Expired’ error. An access token is scheduled to expired every 1 hour so this is expected.
We must create a ‘pre-poll’ method on any Trigger we have created, in order to modify the HTTP request just before it is sent, so we can add the Marketo Access Token in its parameters.
We must create a ‘pre-write’ method on any Action we have created, for the same reason.
All post_poll and post_write methods
We must create a ‘post-poll’ method on any Trigger we have created, in order to parse responses before Zapier does anything with them, and eventually intercept ‘Access Token Expired’ error.
We must create a ‘post-write’ method on any Action we have created, for the same reason.
If such an error has occurred, we throw an InvalidSessionException that will tell Zapier to replay the authentication and execute again the get_session_info method.
Note that you can access the Bundle logs from the Scripting API from the ‘Quick links’ menu on the top right corner of the screen. This is really useful to debug the scripts.
And now it’s time for the fun part…
Use Case 1: Integration of Marketo with FullContact Card Reader
For this integration we’ll create one single Zap from FullContact to Marketo. With this Zap, you’ll be able to scan business cards with the FullContact Mobile Card Reader and push the leads to Marketo.
Zap FullContact à Marketo
From the Zapier Dashboard click the button ‘Make a new Zap’.
Trigger in Zapier
Pick the App FullContact
Choose FullContact Trigger ‘New Business Card’
Connect to your FullContact account
Test the FullContact App
Action in Zapier
Pick the App Marketo we just created earlier, it should display in Beta
Choose Marketo Action ‘Create_Update Lead’
Connect to your Marketo account, filling up the authentication parameters (Munchkin Account Id, Client Id, Client Secret)
Map the fields from FullContact to Marketo
Fill-up eventually a Partition Name where your new leads should go (only if partitions exist in your Marketo Instance)
Test the Marketo App
Activate your Zap
Make sure you download the business cards Reader from FullContact and activate the Zapier Integration right from your mobile device.
Use Case 2: Integration of Marketo with Google Sheets
For this integration we’ll create two Zaps. One from Marketo to Google Sheets and another one from Google Sheets to Marketo. With this Zap, you’ll be able to synch up some of your leads or contacts between Marketo and a Google Sheet.
Zap Marketo Webhook à Google Sheets
For the first Zap, we don’t rely on a custom connector for Marketo, but we leverage Marketo’s Webhooks and the ‘Webhooks by Zapier’ Trigger.
From the Zapier Dashboard click the button ‘Make a new Zap’.
Trigger Part 1 in Zapier
Pick the ‘Webhooks by Zapier’ Trigger App
Check ‘Catch Hook’ that will allow to wait for a POST or GET to a Zapier URL
No need to pick off a child key
Zapier generated a custom webhook URL for you to send requests to, copy it in the clipboard
Webhook in Marketo (steps to be done by an Administrator)
Go to Admin à Webhooks
Create a new Webhook called ‘Push Lead to Zapier’ and edit the Webhook form :
In the template’s field, declare all the Lead’s fields you would like to transfer to Zapier and leverage the Marketo’s tokens. For our Use Cases, we take the same fields we defined for the custom Zapier connector that push Leads to Marketo:
{“firstName”:”{{lead.First Name}}”,”lastName”:”{{lead.Last Name}}”,”email”:”{{lead.Email Address}}”,”phone”:”{{lead.Phone Number}}”,”leadOwner”:”{{lead.Lead Owner First Name}} {{lead.Lead Owner Last Name}}”,”leadOwnerEmail”:”{{lead.Lead Owner Email Address}}”,”leadNotes”:”{{lead.Lead Notes:default=edit me}}”,”called”:”{{lead.Called}}”}
Save the form
No need for a Response Mapping, so you’re done with the webhook
Test Campaign in Marketo (steps to be done by a Marketer or an Administrator)
From the Marketing Activities, create a new Smart Campaign
For testing purpose we are going to create a campaign that trigger our Webhook each time a lead is changing its status to MQL. Of course you can use the webhook for any other business purpose.
Edit the Smart List
Call the Webhook in the Flow
Schedule the Campaign
Make sure each lead can run through the flow every time
Activate the Smart Campaign
Trigger Part 2 in Zapier
In order to complete the ‘Webhooks by Zapier’ Trigger App, we need to fire the Marketo Smart Campaign once and catch the Webhook in Zapier
In our test case, we just need to go to Marketo Lead Database, open a lead and change its status to ‘MQL’
Create the spreadsheet in Google Sheets
Create a new spreadsheet
Create a Worksheet or use the default one
Add a column for each field you want to synch from Marketo (the ones declared in the Marketo webhook)
Action in Zapier
Pick the App Google Sheets
Check the option ‘Create Spreadsheet Row’
Connect to your Google Sheets account
Select your Google Sheets spreadsheet
Select the Worksheet
Map all the fields between the ‘Webhooks by Zapier’ Trigger App and Google Sheets:
Test the Google Sheets App
Activate your Zap
Zap Google Sheets à Marketo
From the Zapier Dashboard click the button ‘Make a new Zap’.
Trigger in Zapier
Pick the ‘Google Sheets’ Trigger App
Tick the ‘Updated Spreadsheet Row’ that triggers when a new row is added or modified in a spreadsheet
Connect to your Google account
Select the Spreadsheet you want to trigger from (should be the same one used in the previous Zap) and the Worksheet
Set Trigger Column to ‘any_column’
Test the Google Sheets App
Action in Zapier
Pick the App Marketo we just created earlier, it should display in Beta
Choose Marketo Action ‘Create_Update Lead’
Connect to your Marketo account, filling up the authentication parameters (Munchkin Account Id, Client Id, Client Secret)
Map the fields from Google Sheets to Marketo
Fill-up eventually a Partition Name where your new leads should go (only if partitions exists in your Marketo Instance)
Test the Marketo App
Activate your Zap
Wrap-Up
Here are some axes of improvement for our Marketo connector for Zapier:
Adding other Triggers and Actions related to diverse Marketo objects (Lists, Custom Objects, etc …).
Instead of hard coding the fields from Marketo, it’s possible to pull dynamically the fields from Marketo but that would require some technical translation work between Marketo and Zapier.
Sharing the connector with development team and eventually make it generally available.
Zapier has deployed since a Premium Marketo adapter making our use cases much easier to implement. In any cases, this article could always be leveraged in order to integrate Marketo with Zapier with a free Zapier plan and also to build extreme use cases that would not be always supported by the premium adapter. Typically, thanks to the Zapier Scripting API, it would make it possible to implement a connector capable of running some coded logic prior to update Marketo with data.
We hope you enjoyed this article and that it will help you to be even more successful with Marketo and Zapier. Thank You!
While the most common style of .Net development for Microsoft Dynamics CRM Online is using the SOAP endpoint with early or late bound types, there are situations where you need to use the Web Services Description Language (WSDL) endpoint directly. This article is intended to provide some understanding how to leverage this light-weight endpoint that can be used from non-.NET languages. It provides some practical examples in Java that could be transposed to any other popular language.
Microsoft Dynamics CRM Online organizations created since July of 2012 are using the Microsoft Office 365 authentication and billing platform. This was a switch from using Microsoft LiveID since the beginning of Microsoft CRM Online in April of 2008. This article is covering the latest Office 365 Authentication scenario that would fit most of the recent CRM online deployments. An article from the Microsoft Developer Network (referenced at the end of this article) is covering the LiveID scenario.
We’ll start to look at the generation of the Microsoft Dynamics CRM Organization web service stub from its WSDL endpoint and then we’ll see how to authenticate a user via the Office 365 platform’s Secure Token Service (STS) and encode the resulting tokens in a security header securing all operations with the Dynamics CRM Organization service. Finally some of the basic Organization service operations will be covered along with some considerations around performances and potential issues.
Make sure that the System variable JAVA_HOME is set and pointing to the main Java Repository and that the path to the Java binaries is appended to the Operating System Path.
The Microsoft Dynamics CRM Organization web service stub can be generated with the WSDL2Java command, available right from the bin folder of Apache Axis2:
{Path to Axis2 Lib}\axis2-1.6.2\bin> WSDL2java -uri https://{Your CRM Org domain}.crm.dynamics.com/XRMServices/2011/Organization.svc?wsdl -p {Java package for the generated stub source} -s -o {Path for the generated stub source}
If you prefer to use Apache Ant in order to automate the stub generation, the Ant task would look like this in your build.xml file:
<!—Microsoft Dynamics CRM 2011 Organization Stub generation –> <target name=“gen-organization-stub”> <taskdef name=“axis2-wsdl2java” classname=“org.apache.axis2.tool.ant.AntCodegenTask” classpathref=“build.classpath”/> <axis2-wsdl2java wsdlfilename=https://{Your CRM Org domain}.crm.dynamics.com/XRMServices/2011/Organization.svc?wsdl packageName=“{Java package for the generated stub source} ” output=“{Path for the generated stub source}” syncOnly=”true” /></target>
An example of Java package could be like “com.mycompany.dynamicscrm.integration” and the path for the generated stub source should be right within your Java project source folder.
Note that with the “s/syncOnly” option of the command, the generated stubs will contain exclusively the synchronous invocation methods.
A detailed documentation of the WSDL2Java command can be found here.
The generated source code for the stub should be a set of 9 Java classes:
OrganizationServiceStub.java is the main stub for the Microsoft Dynamics CRM 2011 Organization Service and the other classes are Java exceptions related to the service’s basic operations.
Authentication via the Microsoft Office 365 Secure Token Service (STS)
Typical STS Authentication request
Here is a typical SOAP/HTTPS request to authenticate a user through the Microsoft Office 365 STS with the associated main headers:
Generate the dynamic token values and prepare the SOAP request in order to authenticate a user through the Microsoft Online STS:
// Prepare input parameter for CRM Authentication Request // > Random Message Id String paramMessageId = UUID.randomUUID().toString(); // > Request Timestamp and +5 minutes validity TimeZone gmtTZ = TimeZone.getTimeZone(“GMT”); SimpleDateFormat formatter = new SimpleDateFormat(“yyyy-MM-dd’T’HH:mm:ss”); formatter.setTimeZone(gmtTZ); Calendar calendar = Calendar.getInstance(gmtTZ); Date timestampRequest = calendar.getTime(); calendar.add(Calendar.MINUTE, 5); Date timestampExpiryRequest = calendar.getTime(); String paramTimestampRequest = formatter.format(timestampRequest); String paramTimestampExpiryRequest = formatter.format(timestampExpiryRequest); // > Random Token Id String paramTokenId = “uuid-“ + UUID.randomUUID().toString() + “-1”; // Prepare CRM Online authentication SOAP request String onlineCRMAuthSOAPEnvelope = String.format( MSDC_ONLINE_AUTH_SOAP_ENVELOPE_TEMPLATE, paramMessageId, paramTimestampRequest, paramTimestampExpiryRequest, paramTokenId, userName, userPassword);
Now it is time to send the authentication request to the Microsoft Online STS, via SOAP/HTTPS …
// Send CRM Online authentication SOAP request to Microsoft online STS String onlineCRMAuthResponseXML = postSOAPRequest( “https://login.microsoftonline.com/RST2.srf“, onlineCRMAuthSOAPEnvelope);
… For that, we can leverage the Apache HTTP Components:
public static String postSOAPRequest(URI serviceUri, String soapEnvelope) throws ParseException, IOException { HttpResponse response = null; HttpParams params = new BasicHttpParams(); params.setParameter(CoreConnectionPNames.CONNECTION_TIMEOUT, 180000); //time out in ms HttpClient client = new DefaultHttpClient(params); HttpPost post = new HttpPost(serviceUri); StringEntity entity = new StringEntity(soapEnvelope); post.setHeader(“Content-Type”, “application/soap+xml; charset=UTF-8”); post.setEntity(entity); response = client.execute(post); return EntityUtils.toString(response.getEntity()); }
Finally, parse the SOAP response from the STS and gather 3 credentials: securityToken0, securityToken1 and keyIdentifier.
If the credentials cannot be found, then we assume we are facing a failed authentication answer. In that case, the reason and the detail of the error can be parsed instead:
// Parse the CRM Online authentication SOAP response from STS // Create a Java DOM XML Parser DocumentBuilderFactory builderFactory = DocumentBuilderFactory.newInstance(); DocumentBuilder builder = builderFactory.newDocumentBuilder(); // Parse XML with Java DOM XML Parser Document xmlDocument = builder.parse(new ByteArrayInputStream(onlineCRMAuthResponseXML.getBytes())); // Retrieve security tokens and key identifier from security token response. XPath xpath = XPathFactory.newInstance().newXPath(); String securityToken0 = readStringValFromXmlDocument(xmlDocument, “//*[local-name()=’CipherValue’]”,xpath); // If first token is blank, search eventual authentication failure message if((securityToken0==null)||(securityToken0.isEmpty())){ String errorReason = readStringValFromXmlDocument(xmlDocument, “//*[local-name()=’Reason’]”,xpath); String errorDetail = readStringValFromXmlDocument(xmlDocument, “//*[local-name()=’Detail’]”, xpath).substring(20); if((errorReason!=null)&&(errorReason.equalsIgnoreCase(“Authentication Failure”))){ logger.debug(“Failed authentication for User ‘” + userName + “‘. Reason is ‘” + errorReason + “‘ and Detail is “ + errorDetail); throw new MSDCAuthenticationException(errorDetail); // Exception to craft according to your needs } else { logger.debug(“Failed authentication for User ‘” + userName + “‘ but cannot parse the reasons”); throw new MSDCAuthenticationException (“Failed authentication for unexpected reasons); } } String securityToken1 = readStringValFromXmlDocument(xmlDocument, “(//*[local-name()=’CipherValue’])[2]”,xpath); String keyIdentifier = readStringValFromXmlDocument(xmlDocument, “//*[local-name()=’KeyIdentifier’]”, xpath);
Implementation for the method readStringValFromXmlDocument:
Calling Dynamics CRM Organization Service Invocation Methods in Java
Instantiation of the Organization Service Stub
In order to instantiate the Organization Service Stub from the Java classes generated from the WSDL, we must first configure Axis2 by creating a configuration context from the ‘axis2.xml’ file that we placed at the root of the project source code. This file is a copy of the standard ‘axis2.xml’ file that can be found in the ‘conf’ directory of the Axis2 Java library.
We need to also pass, along with the configuration context, the URL of the Dynamics CRM 2011 Online Organization.
// Create OrganizationServiceStub String fileSeperator = System.getProperty(“file.separator”); String userDir = System.getProperty(“user.dir”); String axis2ConfigFilePath = userDir + fileSeperator + “src” + fileSeperator + “axis2.xml”; ConfigurationContext ctx = ConfigurationContextFactory.createConfigurationContextFromFileSystem(userDir, axis2ConfigFilePath); organizationServiceStub = new OrganizationServiceStub(ctx, “https://myCRMOrg.crm.dynamics.com“); // Get service client implementation used by this stub. serviceClient = organizationServiceStub._getServiceClient();
We keep most of the default parameters in the ‘axis2.xml’ file except a custom inflow predefined Phase called ‘MustUnderstandChecker’ that must be declared in this file:
. . . <!– ================================================= –> <!– Phases –> <!– ================================================= –> <phaseOrder type=“InFlow”> . . . <phase name=“RMPhase”/> <!– System predefined phases –> <!– After Postdispatch phase module author or service author can add any phase he want –> <phase name=“OperationInPhase”> <handler name=“MustUnderstandChecker“ class=“ com.mycompany.dynamicscrm.integration.Axis2MustUnderstandChecker“> <order phase=“OperationInPhase”/> </handler> </phase> . . . </phaseOrder> . . .
Here is an implementation of the Axis2MustUnderstandChecker class that tells Axis2 client to process the security SOAP header block from the message context header:
/*** * Handler for SOAP header. * */ public final class Axis2MustUnderstandChecker extends AbstractHandler { public Axis2MustUnderstandChecker() { } /* (non-Javadoc) * Process the Security SOAP header block from the message context header. * @see org.apache.axis2.engine.Handler#invoke(org.apache.axis2.context.MessageContext) */ public InvocationResponse invoke(MessageContext msgContext) throws AxisFault { SOAPHeader header = msgContext.getEnvelope().getHeader(); if (header != null) { Iterator<?> blocks = header.examineAllHeaderBlocks(); while (blocks.hasNext()) { SOAPHeaderBlock block = (SOAPHeaderBlock) blocks.next(); if(block != null){ if (block.getLocalName().equals(“Security”)) { block.setProcessed(); } } } } return InvocationResponse.CONTINUE; } }
SOAP Requests options and Security SOAP header block
After the instantiation of the Organization Service Stub, some options must be set and a fresh Security SOAP header block must be defined:
try { Options scOptions = serviceClient.getOptions(); scOptions.setMessageId(“urn:uuid:” + UUID.randomUUID().toString()); EndpointReference endPoint = new EndpointReference(“http://www.w3.org/2005/08/addressing/anonymous”); scOptions.setReplyTo(endPoint); serviceClient.setOptions(scOptions); // Add fresh Security SOAP Header block serviceClient.addHeader(generateFreshSecuritySoapHeaderBlock(securityHeader)); serviceClient.engageModule(“addressing”); } catch (AxisFault af) { throw new MSDCIntegrationException(“Unexpected web service error”, af); }
Here is the detail of the method ‘generateFreshSecuritySoapHeaderBlock’ that generate a brand new security SOAP header block including some fresh timestamps with a validity period (set arbitrarily in our case to 5 minutes) and a security header embedding the credentials from the Microsoft Online STS authentication:
The method ‘generateFreshSecuritySoapHeaderBlock’ takes the Security Header string as an input parameter and it can be built with the following template:
Generate the security header string with the following Java code, replacing the 3 tokens in the template by the credentials obtained from the Microsoft Online STS authentication:
Here is an example of a high level ‘Create’ method that create an object in Dynamics CRM 2011 Online with the following parameters:
entityLogicalName: the logical name of the entity to create, e.g. ‘account’,
attributesHash: an HashMap of attributes (pairs of attribute keys and values), e.g. {“name”, “Test Account”},{“address1_city”, “Paris”}, etc.,
organizationService: the Dynamics CRM Organization Service stub instantiated and augmented with the options and the fresh Security SOAP header block.
public String executeCreate(String entityLogicalName, HashMap<String,String> attributesHash, OrganizationServiceStub organizationService) throws MSDCIntegrationException { // Transfer attributes from HashMap to Stub attribute collection OrganizationServiceStub.AttributeCollection attributeCollection = new OrganizationServiceStub.AttributeCollection(); Iterator<String> it = attributesHash.keySet().iterator(); while(it.hasNext()){ String key = it.next(); OrganizationServiceStub.KeyValuePairOfstringanyType KeyValuePair = new OrganizationServiceStub.KeyValuePairOfstringanyType(); KeyValuePair.setKey(key); KeyValuePair.setValue(attributesHash.get(key)); attributeCollection.addKeyValuePairOfstringanyType(KeyValuePair); } // Create Entity with attributes OrganizationServiceStub.Entity entity = new OrganizationServiceStub.Entity(); entity.setLogicalName(entityLogicalName); entity.setAttributes(attributeCollection); OrganizationServiceStub.Create createEntity = new OrganizationServiceStub.Create(); createEntity.setEntity(entity); // Send Create command to Organization web service String resultGuid = null; try { OrganizationServiceStub.CreateResponse createResponse; createResponse = organizationService.create(createEntity); OrganizationServiceStub.Guid createResultGuid = createResponse.getCreateResult(); resultGuid = createResultGuid.getGuid(); } catch (RemoteException | IOrganizationService_Create_OrganizationServiceFaultFault_FaultMessage e) { throw new MSDCIntegrationException(“Unexpected web service error”, e);
}
logger.debug(“Entity ‘” + entityLogicalName + “‘ created successfully with GUID = “ + resultGuid);
return resultGuid;
}
Here are some of the other public methods you can invoke on the Organization Service stub:
Associate: Creates a link between records.
Delete: Deletes a record.
Disassociate: Deletes a link between records.
Execute: Executes a message in the form of a request, and returns a response.
Retrieve: Retrieves a record.
RetrieveMultiple: Retrieves a collection of records.
Update: Updates an existing record.
Performance considerations
Instantiating the Organization Service stub can takes up to 75% of the time of a single transaction, this is why this operation should be minimized at any cost.
It is recommend to keep the same stub instance with one security header for a few consecutive operations within a single stateless transaction. The security SOAP header block has got a timestamp with a validity period and this period should not expire.
If the application is stateful, the stub can be cached. Once instantiated, the security SOAP header block can be regenerated for each further usages. The cost of this operation is minimal.
Before to rebuild a security SOAP header block, the headers of the stub’s service client must be cleared with the command ‘removeHeaders()’:
// Recycling organizationServiceStub serviceClient = organizationServiceStub._getServiceClient(); // Remove existing headers in order to produce a fresh one serviceClient.removeHeaders();
Troubleshooting
Always make sure that the account used to authenticate on the Dynamics CRM server is valid and that it has the required privileges to execute the desired operations on the Organization service.
Undeclared namespace prefix “wsx” Exception at Java runtime when instantiating OrganizationServiceStub:
Probable cause: the generated stub is declaring the “wsx” domain for some tags that are already embedded within some tags from the same domain and the domain is locally declared and not with a global prefix.
Proposed solution: edit the generated Organization Service stub “OrganizationServiceStub.java”, search and replace:
wsx:MetadataReference by MetadataReference
wsx:MetadataSection by MetadataSection
The code samples exposed in this article have been tested only with Dynamics CRM 2011 Online (version 5.0.9690.5010, DB 5.0.9690.3417) and not yet with Dynamics CRM 2013. Some changes will need to be implemented once this new version is officially released.
Conclusion
This article has demonstrated a reliable and quite easy to implement way to integrate Dynamics CRM 2011 Online with Java. The different network frames and algorithms have been detailed so they can be adapted with other languages.
The codes samples of this article have been tested in development but in no mean on a production environment. So prior to implement it in production, adequate testing should be considered and this project will be at your own risks.
The next steps would be to push further this approach to Dynamics CRM On Premise:
Microsoft Developer Network article: Connect Using Java for Microsoft Dynamics CRM Online
This great article walks you through a basic sample code to integrate Dynamics CRM 2011 Online with Java. The authentication is through LiveID and would not work anymore for recently provisioned Dynamics CRM 2011 Online Organizations.
At the beginning, I was trying hard to generate the Microsoft Dynamics CRM Organization Service stubs with the Java API for XML Web Services (JAX-WS), without any success. This article put me on the right track with the Apache Axis2 library that can parse the Organization Service WSDL without any fatal errors.
Microsoft Developer Network article: Download the Endpoints Using the Dynamics CRM Developer Resources Page
This article explains how to download the WSDL from the developer resources pages in the Microsoft Dynamics CRM 2011 and Microsoft Dynamics CRM Online Web application. It provides also some details about the Discovery Service and the Organization Service WSDLs.
Microsoft Developer Network article: IOrganizationService Interface > IOrganizationService Members
This article list the public methods members exposed by the IorganizationService interface, with all their parameters, and is a good starting point to find practical samples of code.
The Microsoft Dynamics CRM 2011 Software Development Kit (SDK)
The official SDK for Dynamics CRM provided by Microsoft contains many useful .Net samples to get started. I have used some of these samples to monitor, with a tool like Fiddler, the HTTPS traffic between my PC and Microsoft Dynamics CRM in order to gather the authentication request sent to the Office 365 Secure Token Service and the security header from the SOAP requests.